QueueMetrics – WombatDialer Recall Scheduling Tutorial
QueueMetrics and WombatDialer for Asterisk PBX Recall Scheduling
In this tutorial, we will walk through the necessary steps needed to activate the QueueMetrics-WombatDialer Recall Scheduling integration.
Imagine a typical call-center situation, with a WombatDialer campaign dialing numbers of potential leads and agents ready to take the calls on a queue.
One of the most common scenario sees the lead potentially interested but unavailable for the time being, so you agree on a better time to have the conversation.
The QueueMetrics Agent Page allows agents to reschedule the call immediately without having to worry about tracking down all these recalls. The rescheduled call will be handled by a specific campaign on WombatDialer and will be executed automatically at a set date and time.
Let’s take a look at the setup.
WombatDialer Configuration
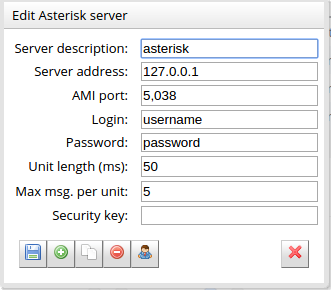
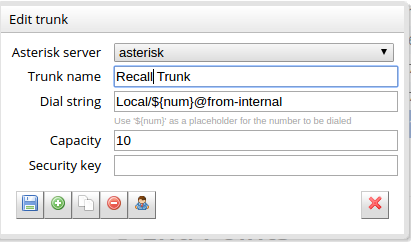
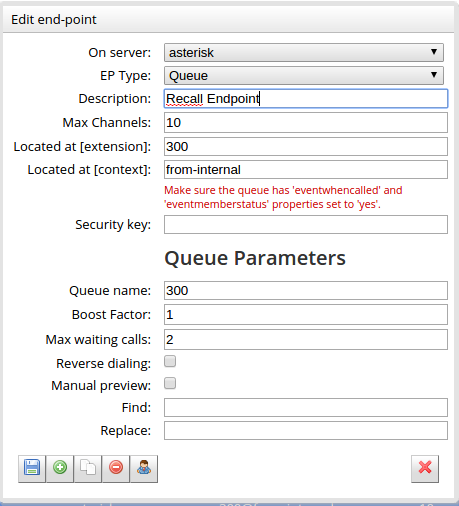
From WombatDialer’s homepage go to Edit Basic Settings. There we can set up the Asterisk servers, trunks and endpoints needed. Here is an example of a basic configuration.
Asterisk Server
Trunk
Endpoint
Then, back to the homepage, we must create a dedicated campaign for our recalls.
Go to Edit Campaigns and create a new campaign.
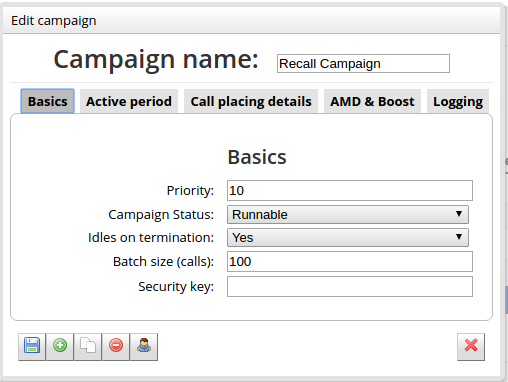
Remember to set the Idles on termination setting to yes, since the campaign needs to be active even when it doesn’t have any call to do.
QueueMetrics Configuration
To setup QueueMetrics, enter as administrator and, from the homepage, go to Edit System Parameters. Here, we must instruct QueueMetrics on how to reach WombatDialer, in order to pass it the recalls we need to schedule.
To do so, we must add four parameters to our configuration. These parameters are:
-
wombat.url : The URL of our WombatDialer instance.
-
wombat.username : A valid username associated with a user with the needed grants.
-
wombat.password : The password for the user.
-
default.wombat.agent_recall_enabled : Enables the feature and must be set to True.

Now, back to the homepage, we must set up our queues in order to specify the dedicated campaign for the recalls, more than one campaign can be specified, in this case, the different campaigns must be separated using the pipe symbol “|”.
Go to Edit Queues, choose the queue you want to edit and then add the name of the recall campaign in the Recall Campaigns field.

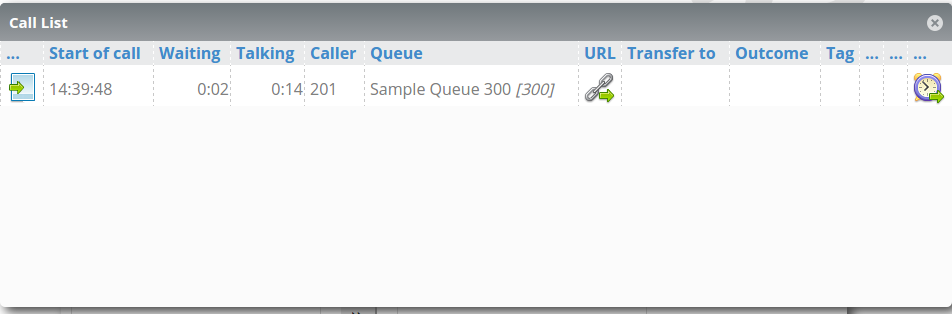
Now we should be ready to go! Log in as an agent and, as soon as you get a call, you will see that in the Call List panel there’s an alarm clock symbol. Clicking on that symbol will allow you to schedule your recall by opening up the Recall Schedule Panel.
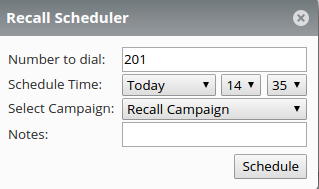
As we can see, in this panel we can set the number to dial, the date and time, the recall campaign and even some notes that might come in handy for when the recall is executed.
That’s all!
QueueMetrics References
For more technical information about QueueMetrics call center solution please refer to the User Manual.
Visit www.queuemetrics.com for a 30 days full featured trial.
Attend our Free Webinars for a live demonstration of QueueMetrics.
WombatDialer References
For more technical information about WombatDialer call center solution please refer to the User Manual.
Visit https://www.wombatdialer.com/ for a 30 days full featured trial.
Attend our Free Webinars for a live demonstration of WombatDialer.
keyboard_arrow_left Back