Easy Integration of QueueMetrics with your Customer Relationship Management software
This tutorial’s purpose is to detail a simple setup to achieve an effective integration between QueueMetrics call-center monitor for Asterisk and your favorite Customer Relationship Management software (CRM).
Our goal is to setup QueueMetrics in such a way that, when performing outbound calls towards lead numbers downloaded from your chosen CRM, like for example Salesforce, it will automatically open the corresponding Lead page in it.
In this tutorial the outbound dialling is managed by the WombatDialer software developed by Loway.
QueueMetrics
QueueMetrics is a highly scalable monitoring software that lets you track agent productivity, payrolls, measure targets, conversion rates, ACD, IVR, Music on hold, generate outbound campaign statistics and monitor realtime processes with customizable wallboards.
You can measure all contact centre activities with more than 200 different metrics and manage realtime processes with extensions and calls control, live alarms, whisper mode, spy and barge mode.
Export the CSV file
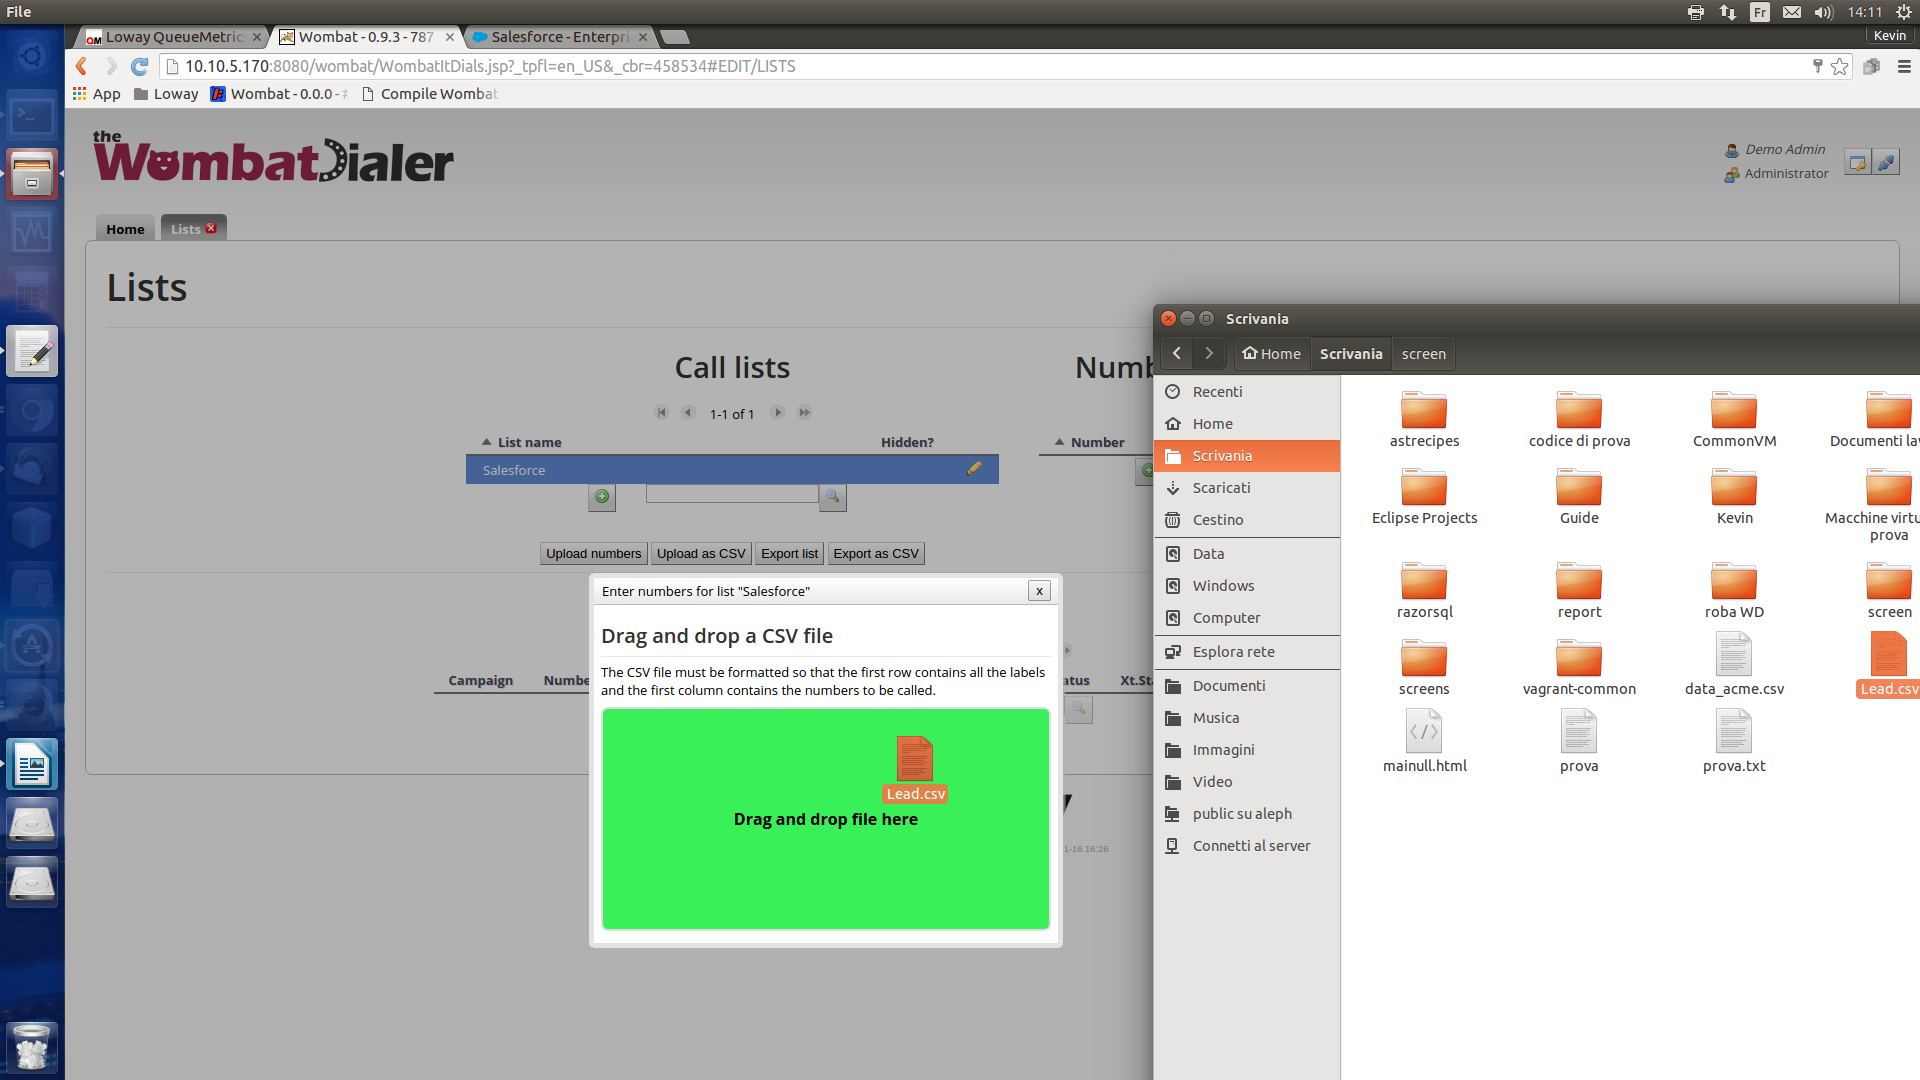
In order for the integration to work, we need a list of contacts to call. The only necessary fields are the number to be called and the CRM Lead id. WombatDialer will interpret the first column of the CSV as the number to call, so it’s important that the Phone field is the first column of the CSV file.
Upload the CSV file
-
In WombatDialer go to Edit Lists.
-
Create a new list by clicking on the green plus button.
-
Choose a name for the list and save it.
-
Select the list and click on the “Upload as CSV” button.
-
Drag and drop the CSV file in the pop up screen.
-
Click on the “Upload” button.
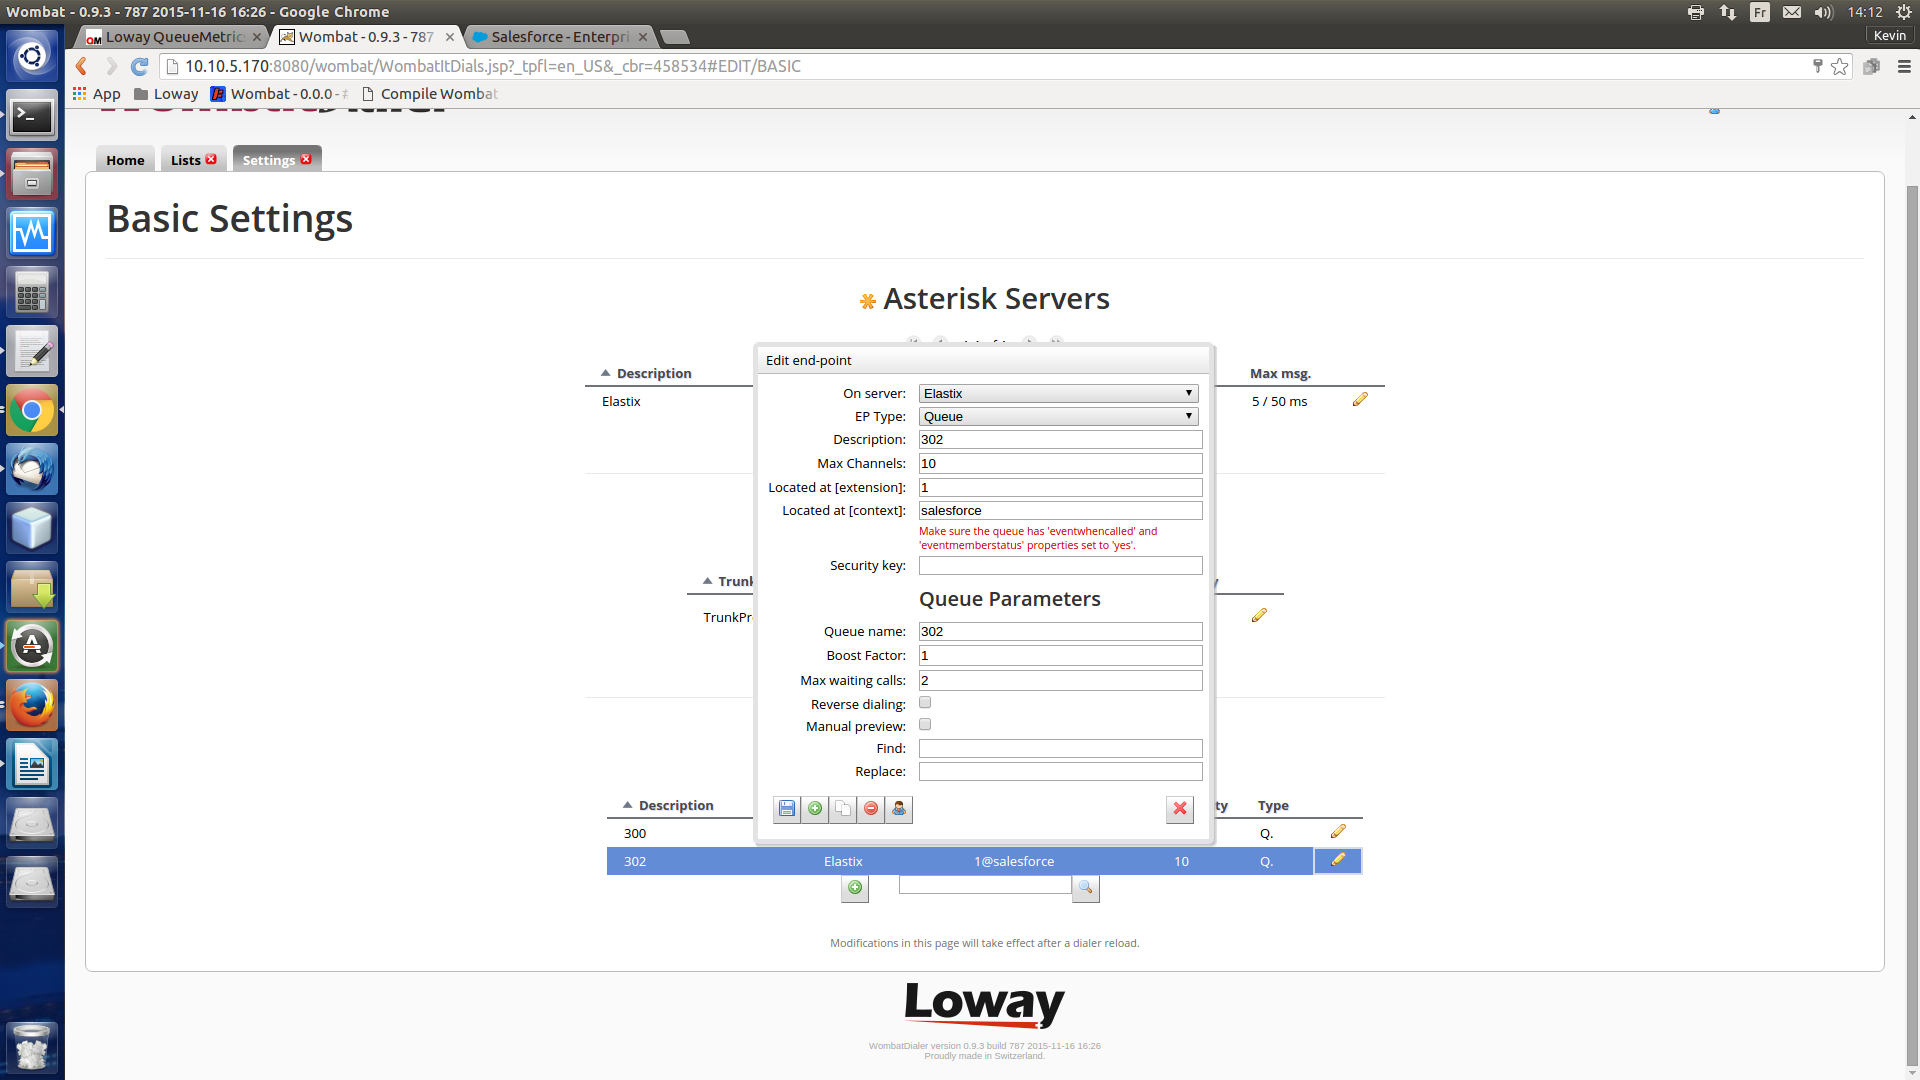
Edit your Campaign’s Endpoint
In order for the integration to work correctly, we must redirect our call to a custom piece of the Asterisk dialplan. We will name this “salesforce” the moment we add it to the dialplan.
-
From WombatDialer’s HomePage go to Edit basic settings.
-
Select your Endpoint in the Endpoints list.
-
Click on the edit button (the pencil icon on the right).
-
Edit the “Located at [extension]” line and write “1”;
-
Edit the “Located at [context]” line and write the name of the piece of dialplan you wish to forward the call (in our case this would be “salesforce”).
Save your settings by clicking on the “save” icon.
Edit the Asterisk Dialplan
Now we need to add our custom context in the Asterisk dialplan.
On your Asterisk server edit the following file:
/etc/asterisk/extensions.conf
At the end of the file add the following lines.
[salesforce]
exten => 1,1,NoOp()
exten => 1,n,AGI(encode.php,${ID})
exten => 1,n,QueueLog(NONE|NONE,${UNIQUEID},INFO|VAR,LEADID,${QM_COMPATIBLE_LEADID})
exten => 1,n,Queue(xxx)
As you can see in the picture below.
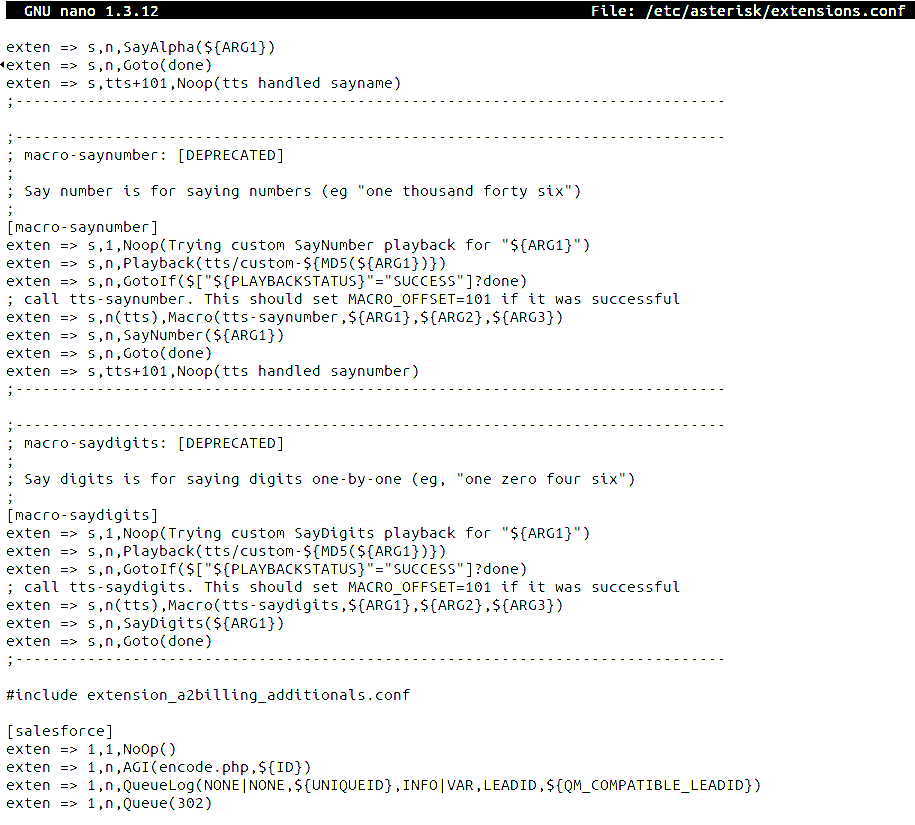
Be sure to change the last line’s Queue parameter (xxx), with the name of the queue you want the calls to be forwarded to.
The second line calls an AGI script we will analyze later on, passing the ID variable (which is how the Field Id is saved in the “Field” table in your CRM). The name of the variable must be the same name of the Field Id attribute in the CVS file, changed to all uppercase letters, as this is how WombatDialer saves CVS attributes.
This script encodes the Lead Id in such a way that it is compatible with QueueMetrics. This script creates a channel variable in the DialPlan called QM_COMPATIBLE_LEADID, containing the field id formatted in a QueueMetrics compatible way.
The third line writes the Lead Id onto the Queue_log file located at /var/log/asterisk/queue_log . This way QueueMetrics can fetch this information when a call is received, in order to open the corresponding CRM page.
The AGI Script
To ensure the correct formatting of the Lead Id we must create a custom php AGI script, called encode.php.
This php file must be created at the following location: /var/lib/asterisk/agi-bin/.
Create the file then copy and paste the following code:
#!/usr/bin/php -q
<?php
require_once "phpagi.php";
$agi = new AGI();
$lead = $argv[1];
$compatibleLead = preg_replace('/([A-Z])/', '-$1', $lead);
$agi->set_variable("QM_COMPATIBLE_LEADID",$compatibleLead);
?>
See the below picture.
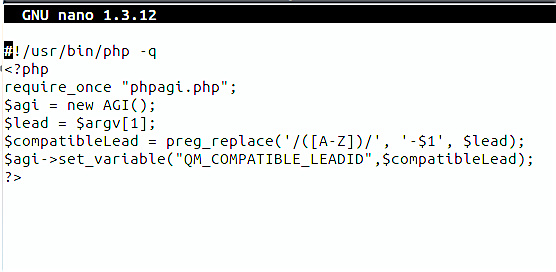
Make sure you make the script executable. To do this you must execute the following command:
sudo chmod 755 /var/lib/asterisk/agi-bin/encode.php
How to install PhpAgi
In order to effectively run a php AGI script, phpagi is required. If it’s not already installed on your machine follow these steps:
-
Download “phpagi” latest version from here:
https://sourceforge.net/projects/phpagi/files/latest/download?source=files
-
Extract the folder contained in the downloaded archive.
-
Go to the location you extracted the folder and execute the following commands:
	mv      phpagi-x.yy/phpagi.php        	/var/lib/asterisk/agi-bin/
	mv      phpagi-x.yy/phpagi-asmanager.php	/var/lib/asterisk/agi-bin/
	mv      phpagi-x.yy/phpagi-fastagi.php  	/var/lib/asterisk/agi-bin/

	where x.yy is the latest version's number.
QueueMetrics CRM URL Settings
Now we have to configure QueueMetrics in such a way, that all the calls arriving on the queue when answered, will trigger the agent’s page to open the CRM page corresponding to the contacted lead.
In order for QueueMetrics to do this we must set up a translation page that converts the QM Compatible Lead ID into the original CRM Lead Id.
The page is fairly simple to create, we just need to create a new HTML page and host it somewhere accessible from our network.
The code of the page is listed below:
<!DOCTYPE html>
<html>
<body onLoad="myFunction()">

<script>
function myFunction() {
    var query = getQueryParams(document.location.search);
    if (typeof query.lead != 'undefined'){
      window.open("https://"+query.domain+".salesforce.com/"+decode(query.lead));
    }
    else if (query.search=='true'){
      window.open("https://"+query.domain+".salesforce.com/_ui/search/"
      +"ui/UnifiedSearchResults?searchType=2&str="+query.callerid);
    }
}


function getQueryParams(qs) {
    qs = qs.split('+').join(' ');

    var params = {},
        tokens,
        re = /[?&]?([^=]+)=([^&]*)/g;

    while (tokens = re.exec(qs)) {
        params[decodeURIComponent(tokens[1])] = decodeURIComponent(tokens[2]);
    }

    return params;
}

function decode(st){

        var res = st.replace(/-./gi, function myFunction(x){return x.toUpperCase();});
        res = res.replace(/-/gi,"");
        return res;
}

</script>

</body>
</html>
Let’s assume we save this as idtranslator.html on your.domain .
Now we need our agent page to automatically access this page when it receives a call.
-
From the QueueMetrics home-page Go to Edit Queues.
-
Press the edit icon (pencil icon) of the selected queue.
-
Edit the Default queue URL field by adding the following:
https://your.domain/idtranslator.html?domain=xxx&lead=[V:leadid]
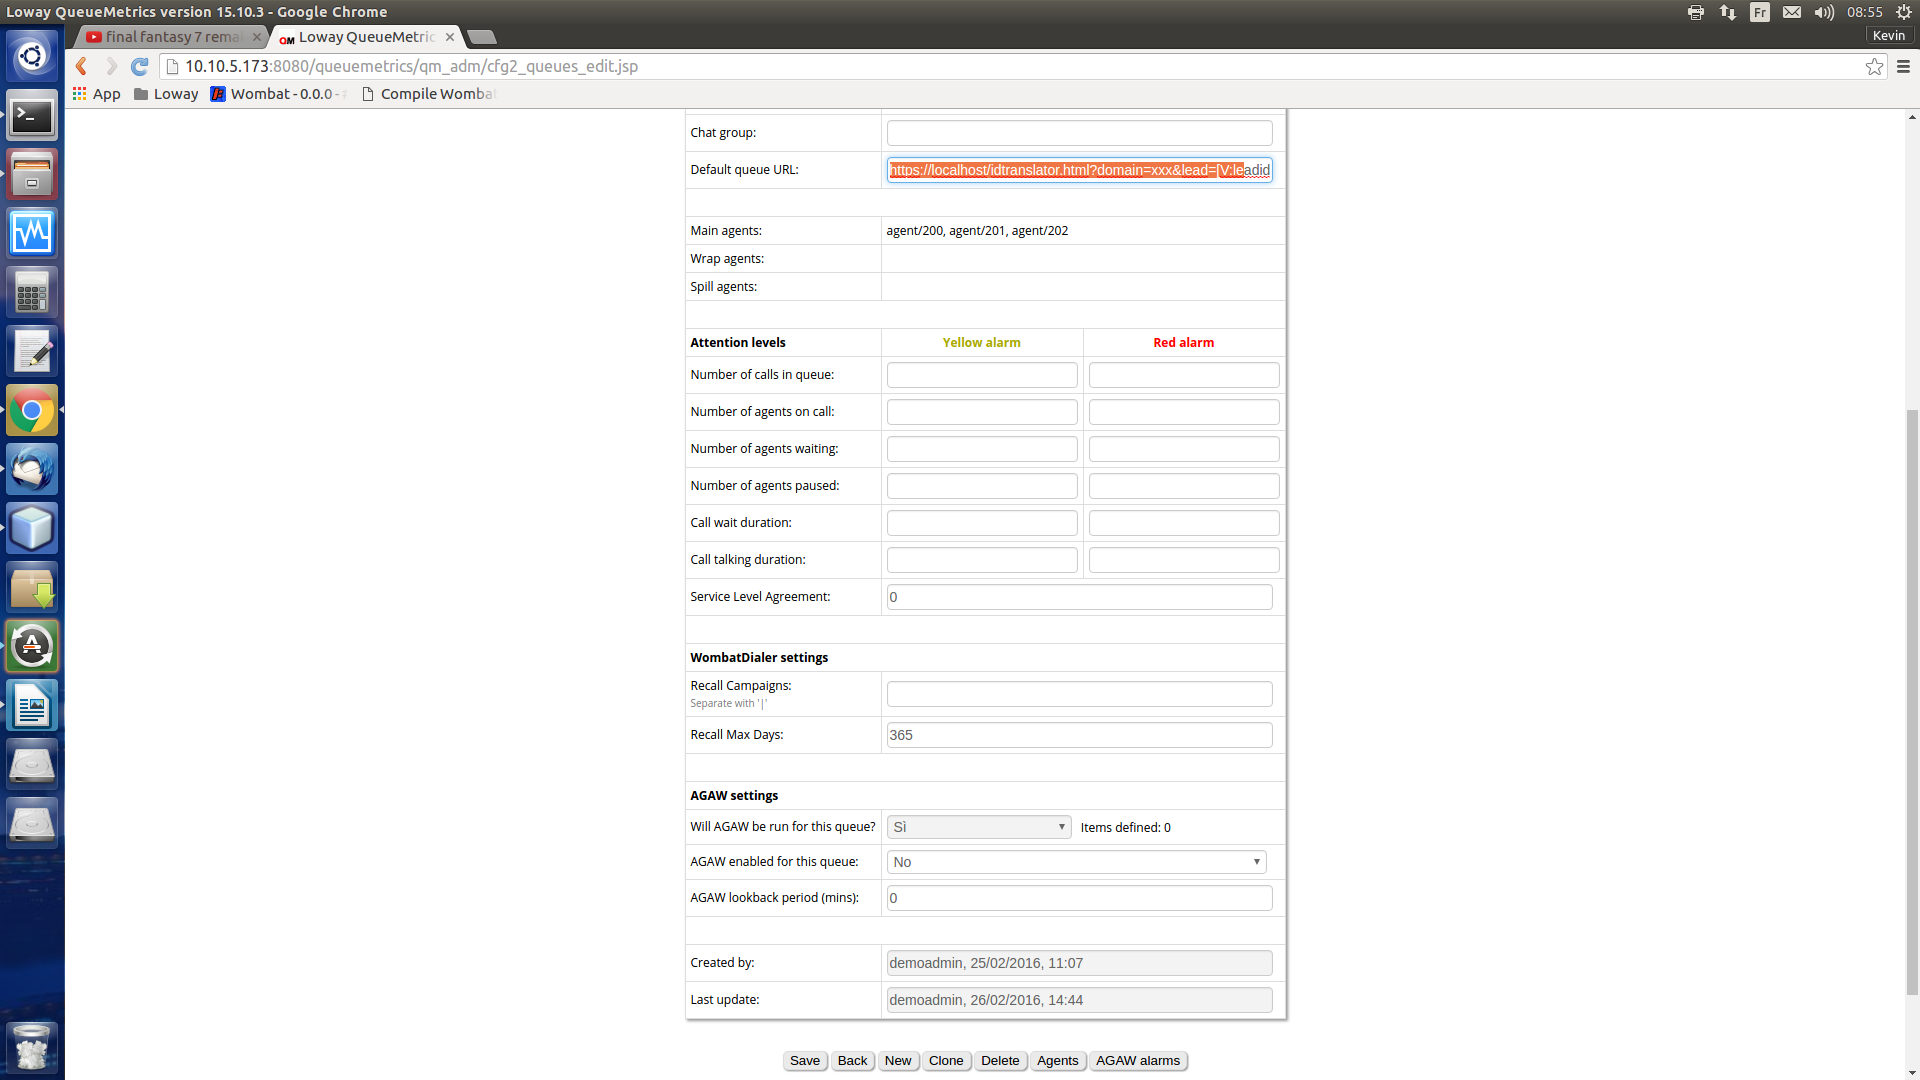
where the value of the domain field must be substituted with the right CRM domain (e.g. cs4).
Click on the Save button at the bottom of the page.
In order for it to work together with the Agent Page, the idtranslator.html file must be accessible through https connection.
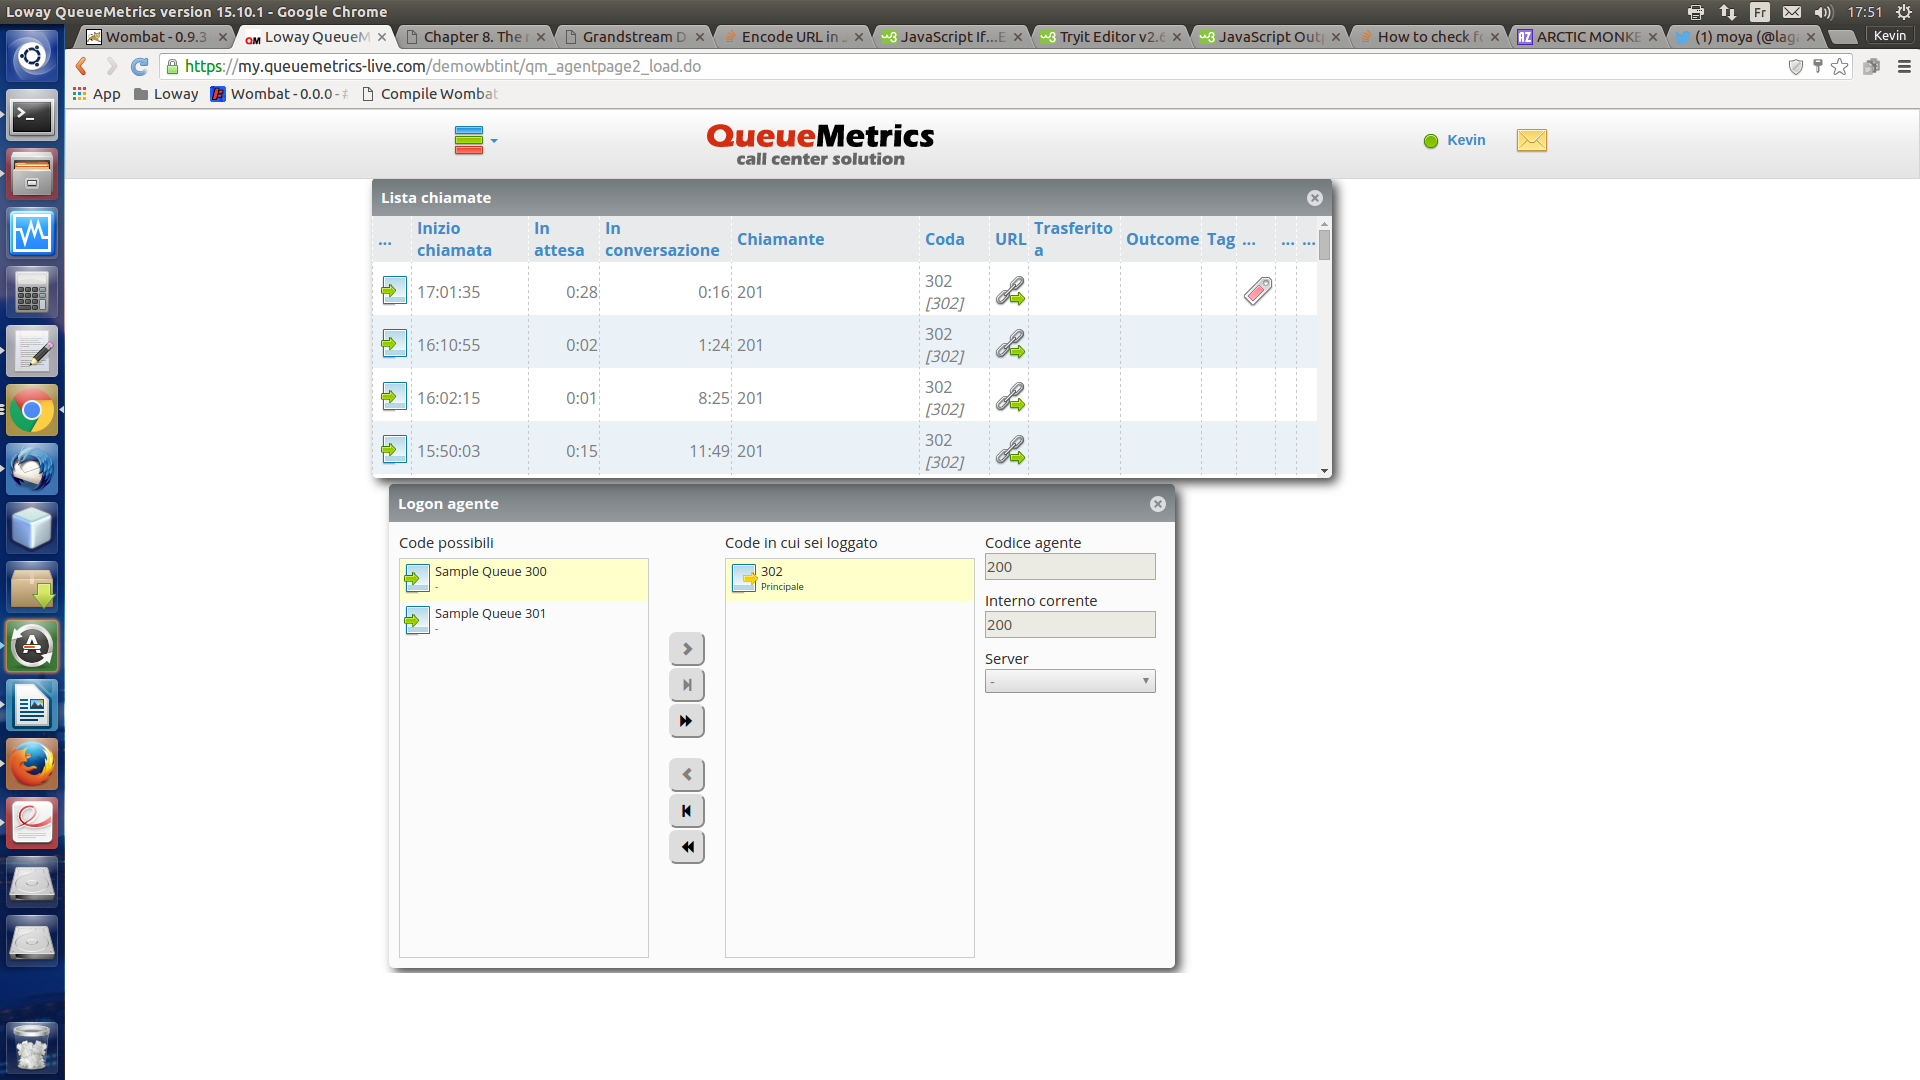
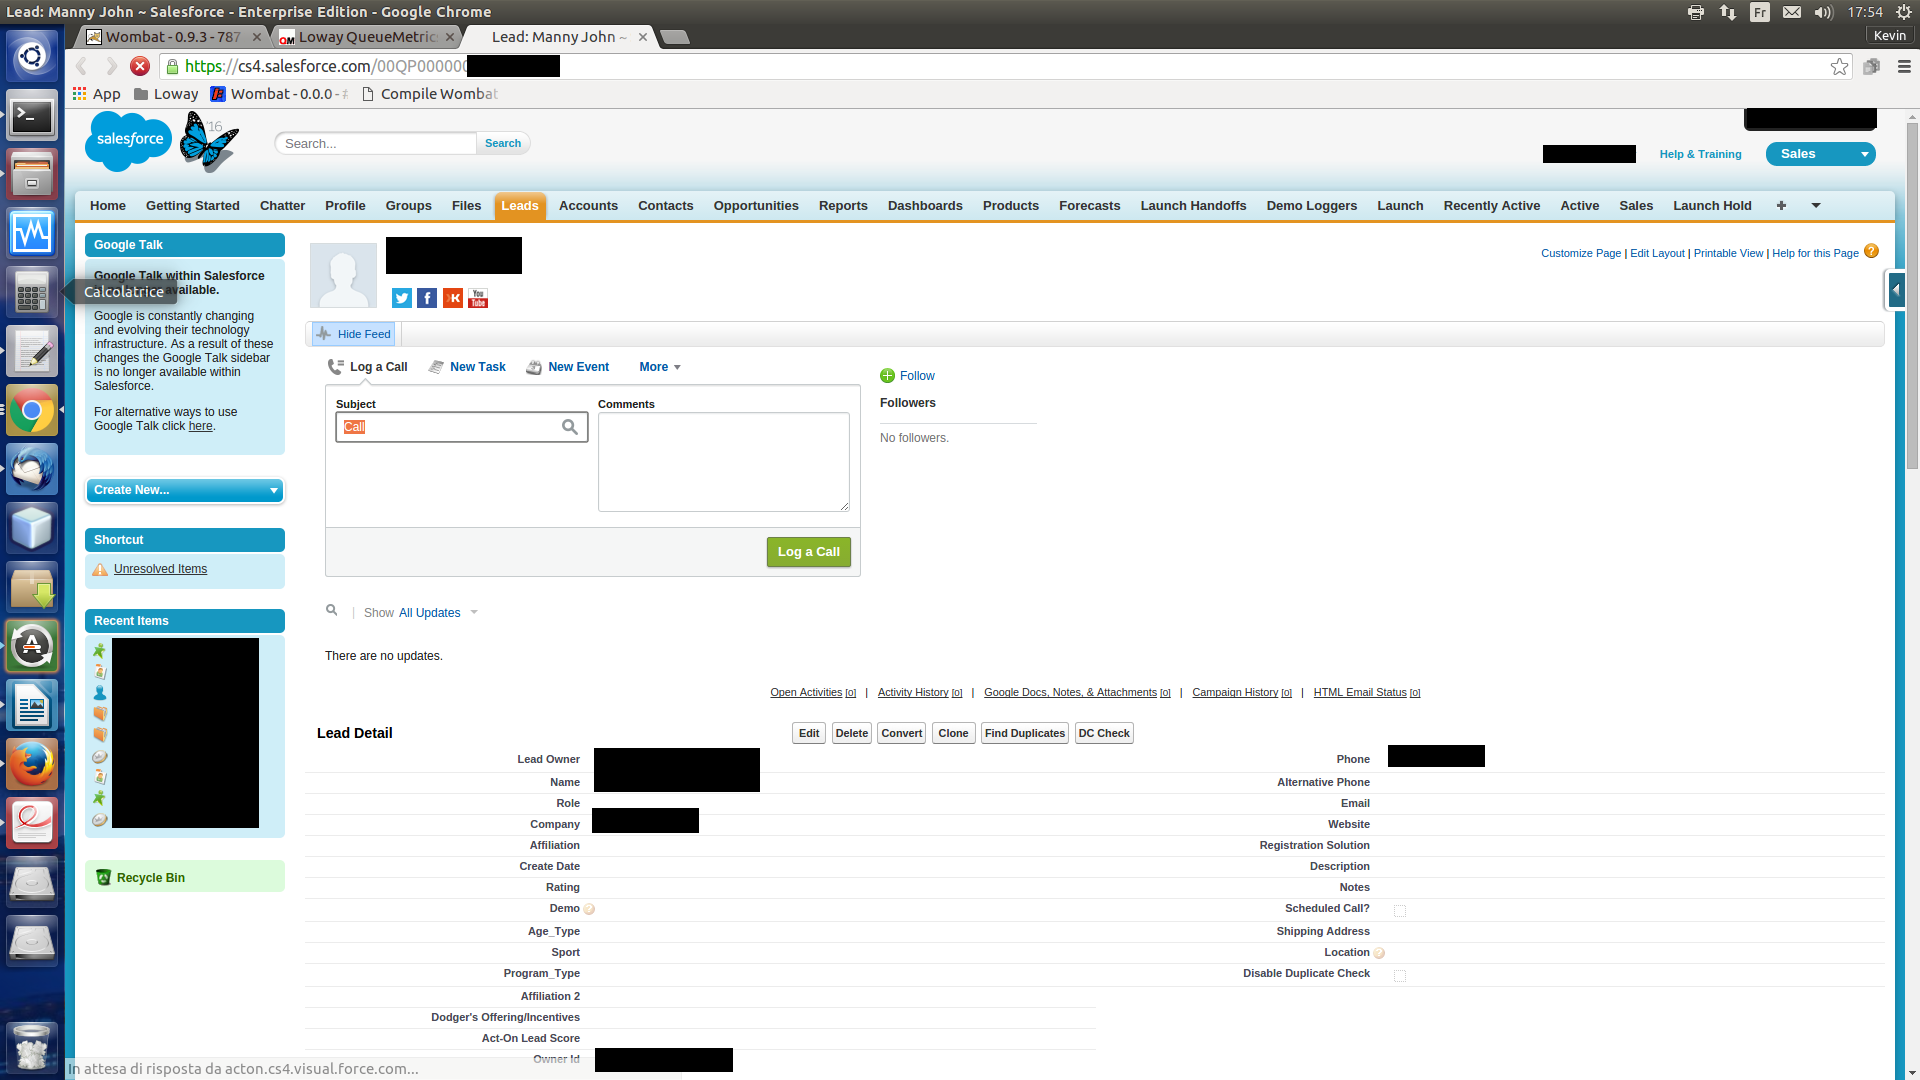
Login as Agent
Now we should be ready to go. When an agent logs in on a queue it will be able to receive the calls forwarded to it, and the Lead page of the contact will pop up as soon as the agent receives the call. (Remember to allow pop-ups from QueueMetrics). If you want to pop-up the page manually press on the URL simbol in the calls list.
See the below shots.
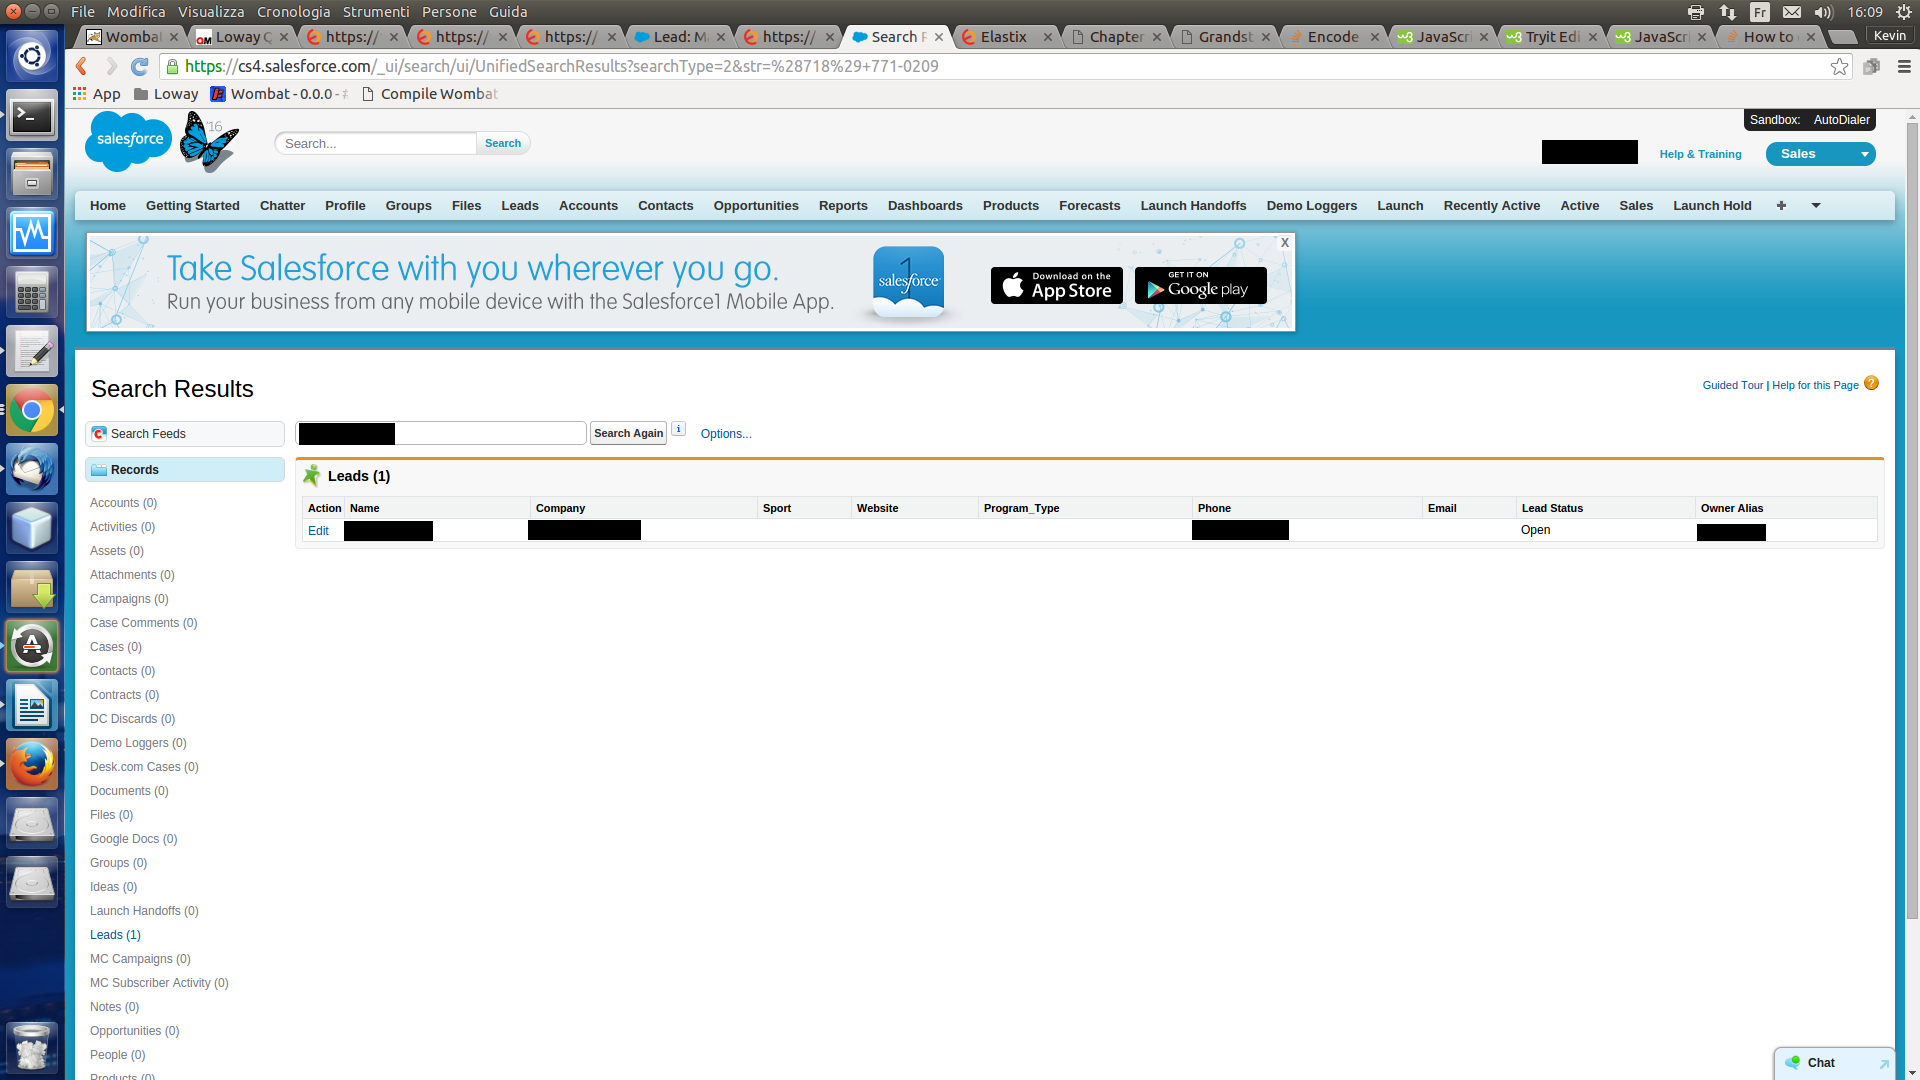
Search Function
Another simple solution for an effective QueueMetrics – CRM integration is taking advantage of its search functionalities. In this case you just need to set your queue URL in such a way that it can ask the CRM for all the data concerning a desired telephone number.
The URL will be:
https://your.domain/idtranslator.html?domain=xxx&search=true&callerid=[C]
Where the value of the domain field must be substituted with the right CRM domain (e.g. cs4).
This way QueueMetrics will ask the CRM to search for the telephone number of the contact the agent is talking with.
QueueMetrics References
QueueMetrics software is available on premise or as a cloud hosted service for FreePBX, Yeastar S PBX, Grandstream, Issabel, FusionPBX and many other Asterisk distros.
For more technical information please refer to the User Manual.
Visit www.queuemetrics.com for a free 30 days full featured trial.
Attend our Free Webinars for a live demonstration of QueueMetrics.
keyboard_arrow_left Back