Initial QueueMetrics configuration of Agents, Users and Queues

How to configure your Agents, User and Queues, in QueueMetrics, now that the initial implementation is done?
In this guide, we will go through the steps you want to take to ensure that your agents are correctly set up.
Understanding the difference
Do you want to use static or dynamic agents?
Do you want our agents to be able to log in and out of queues, when their extension is registered to the PBX? If the answer is “yes”, you want to use dynamic agents; Otherwise you want to use static agents, that are “stuck” on the queues they are assigned on, with no possibility to log out.
We recommend using dynamic agents, as it allows for better tracking of agent activity, and a better integration with QueueMetrics’ functionalities.
Do you want your agents to be able to change extension number when they log on the queue?
If the answer to this question is “yes”, then you can leave the default Hotdesking enabled. If the answer is no, you can disable this in QueueMetrics.
To enable/disable hotdesking in QueueMetrics, we need to change a single system parameter, in the QueueMetrics “Edit System Parameters” section.
Homepage ⇾ Settings (gear icon in the upper right corner) ⇾ System Administration ⇾ Edit System Parameters
Hotdesking disabled
default.hotdesking=0
Hotdesking enabled
default.hotdesking=86400
What format are the extensions using on the PBX?
Depending on the choices above, you will have to pick the correct extension format, or “context”. This is usually the most tricky part about agent configuration, and the most important thing to know.
Luckily, it’s easy to find out the extension format of your PBX, as described below.
First, access your FreePBX command line and use the following command:
asterisk -x "queue show"
This command will give you a breakdown of all the queues, with the relative registered extensions. Here, you will see the extension format that your PBX configuration is applying.
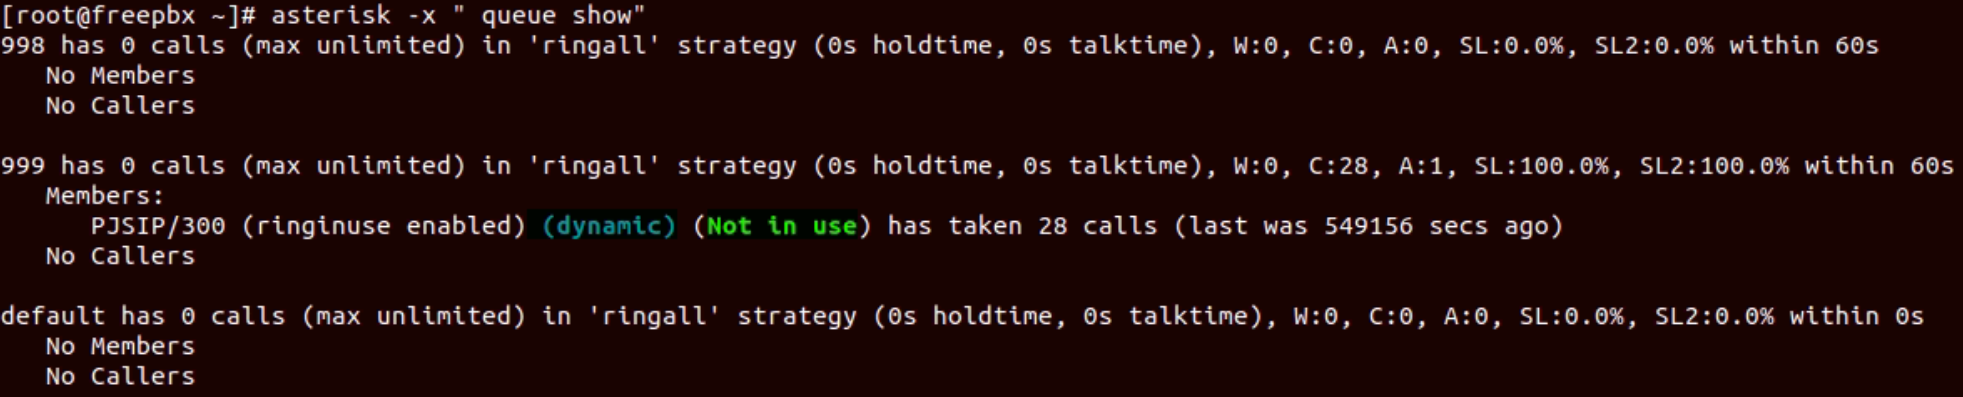
in this example, the extension format is:
PJSIP/${num}
Where ${num} is the extension number. Other examples of extension formats might be:
SIP/${num}
PJSIP/${num}
Local/${num}@from-queue/n
Configuring the AMI Command Format (extension format)
When sending commands for an agent to Asterisk, QueueMetrics will send the command to a particular extension format. You have to define this format to be the same that is used by your agents.
To set this property, we need to head to the “Edit System Parameters” page from QueueMetrics’ home page.
If you are working with hotdesking disabled:
platform.directami.agent=YOUR_EXTENSION_FORMAT
for example:
platform.directami.agent=Local/${num}@from-internal/n
If you are working with hotdesking enabled:
platform.directami.extension=YOUR_EXTENSION_FORMAT
for example:
platform.directami.extension=PJSIP/${num}
QueueMetrics commands
While you are in the “Edit system parameters” section of QueueMetrics, you might as well add the AMI User (Asterisk Manager Interface). This will be useful later if you want QueueMetrics to interact with the FreePBX.
For the on-premise solution, change the following parameter with the AMI credentials:
callfile.dir=tcp:cxpanel:cxmanager*con@PBX_SERVER_IP_ADDRESS
For the Hosted solution of QueueMetrics, you need to leave the default “127.0.0.1” IP address.
callfile.dir=tcp:cxpanel:cxmanager*con@127.0.0.1
NOTE: we are using the default “cxpanel” AMI User, but you can create a separate User just for QueueMetrics.
Agents, Users and Queues in QueueMetrics
Now that we have set up the basics, we can automatically import all the Extensions and Queues from your FreePBX.
We are going to use this simple command, running on your PBX server.
For the on-premise solution, change the IP address (with the QueueMetrics IP, if it’s on another server) and the QueueMetrics admin credentials:
uniloader pbxinfo --mode "syncqm" --uri "http://127.0.0.1:8080/queuemetrics" --login "demoadmin" --pass "demo" --all-queues "1" freepbx --dburi "localhost/asterisk" --login "root" --pwd ""
For the Hosted solution of QueueMetrics, you need to add the URI to the QueueMetrics instance (provided by your Reseller or by Loway)
uniloader pbxinfo --mode "syncqm" --uri "https://my.queuemetrics-live.com/CHANGEME" --login "demoadmin" --pass "PASSWORD" --all-queues "1" freepbx --dburi "localhost/asterisk" --login "root" --pwd ""
This command will create Agents and User for all the Extensions on your PBX; as well as all the Queues.
You might have to delete some unwanted queues, agents or users from QueueMetrics.
Once you have your QueueMetrics Users configured, you will want to set a password for them, in the User configuration page.
QueueMetrics Aliases
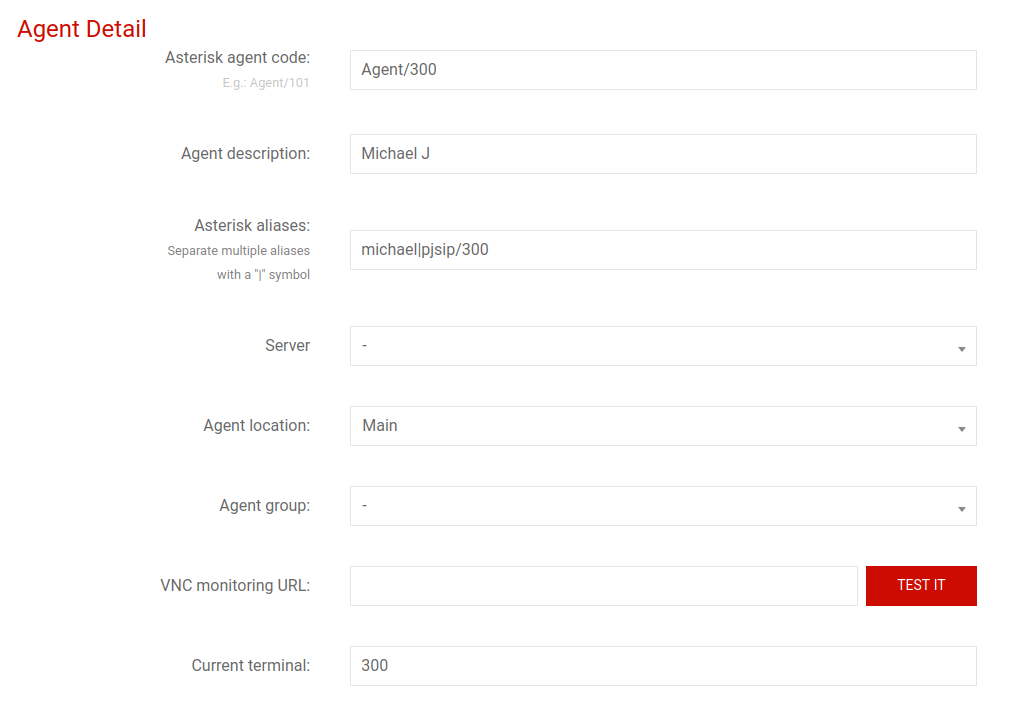
Depending on your configuration, and on the type of logs your PBX is writing, it might be necessary to add an “Alias” to your Agents.
An Alias is simply a way to tell QueueMetrics how the PBX is calling a specific extension.
In this example, the PBX is writing the logs for our “Agent/300” as “Michael” for inbound activity and “PJSIP/300” for outbound activity. This means that our Alias will look something like this:
michael|pjsip/300
Congratulations, now your agents should be correctly configured. You can check this by trying to log in/log-out agents from the agent page, or by making a few calls on the queues and checking the realtime page and the wallboard.
In the next tutorial we are going to focus on the Unitracker service, for outbound tracking, as well as the IVR tracking:
Useful tools for outbound and IVR tracking
QueueMetrics References
QueueMetrics software is available on premise or as a cloud hosted service for FreePBX, Yeastar S PBX, Grandstream, Issabel, FusionPBX and many other Asterisk distros.
For more technical information, please refer to the User Manual.
Visit www.queuemetrics.com for a free 15 days full-featured trial.
keyboard_arrow_left Back