Getting started with the (new) Agent page

This guide is your go-to handbook to the basic functionality of the QueueMetrics Agent page. Designed with agents in mind, it breaks down all the features into easy-to-understand steps. Whether you’re just starting out or have been using the system for a while, this guide has got you covered.
From the basics of logging in to the queues, to more advanced tasks, it offers clear instructions to make sure you get the most out of QueueMetrics.
What is the QueueMetrics Agent page?
The QueueMetrics Agent page is the central hub for Agents using QueueMetrics.
It’s a dedicated interface designed to streamline and optimize the daily tasks of agents. Here, agents can monitor their calls, manage client details, use the integrated CRM tools, and much more.
With its user-friendly layout and comprehensive features, the agent page ensures that agents have all the tools they need at their fingertips, making their workflow smoother and more efficient. Whether handling calls, tracking performance, or accessing essential data, the QueueMetrics Agent page is the one-stop solution for your Agents.
Table of Contents
| Chapter 0: Admin Information | Chapter 6: Notifications | |
| Essential details for administrators. | Staying updated with notifications. | |
| Chapter 1: Logging In | Chapter 7: Clients and Cases | |
| Accessing the QueueMetrics Agent Page. | Managing client and case details. | |
| Chapter 2: Overview | Chapter 8: Custom Links | |
| A summary of daily statistics. | Using custom links. | |
| Chapter 3: Start/End Work | Chapter 9: WebRTC SoftPhone | |
| Managing work sessions. | Using the integrated WebRTC based softphone. | |
| Chapter 4: Queue Control | Chapter 10: Agent Status Panel | |
| Managing queues and agent status. | Viewing and managing agent status. | |
| Chapter 5: Call Interactions | Chapter 11: Keyboard Shortcuts | |
| Overview of daily call interactions. | Efficient navigation using shortcuts. | |
Chapter 0: Admin Information
This chapter is intended for the QueueMetrics administrator, tasked with managing the QueueMetrics software.
The QueueMetrics Agent Page is a pivotal tool for administrators to manage and oversee agent activities. To ensure a seamless experience for agents, administrators must set up and configure the system appropriately.
If you have updated QueueMetrics from a previous version, prior to 23.09, you will need to enable the QueueMetrics Agent page, by editing the User Class or individual User keys.
If you installed QueueMetrics after the release of version 23.09, the agent page will be enabled by default.
User configuration (updated from version previous to 23.09)
Previous to version 23.09 there were 2 versions for the agent page.
- The first ever agent page, used the “AGENT” user key. (we will refer to this page as the old agent page)
- The 2nd agent page used the “AGENT” and “NEWAGENTPAGE” user keys. (we will refer to this page as the Icon agent page)
Now, the latest agent page (the New agent page) uses only the “AGENT” user key.
It might sound a bit counter intuitive, but to enable the new agent page, you will need to remove the “NEWAGENTPAGE” user key, from the users, or the user class.
If you need more details regarding the User and Visibility keys, you can have a look at this guide:
Visibility Keys and You
User configuration (after version 23.09)
The new agent page is enabled by default. If you want to use the Icon Agent page, you will need to add the “NEWAGENTPAGE” key to the User or Class.
Chapter 1: Logging In
The QueueMetrics Agent Page is the primary interface for agents to interact with the system.
This chapter guides you, the agent, in how to access the QueueMetrics system, ensuring a smooth start for your daily tasks.
How to Log In the QueueMetrics Agent page
Access the Login Page
Navigate to the QueueMetrics login page (both admin and agent users share the same login link) using your preferred web browser.
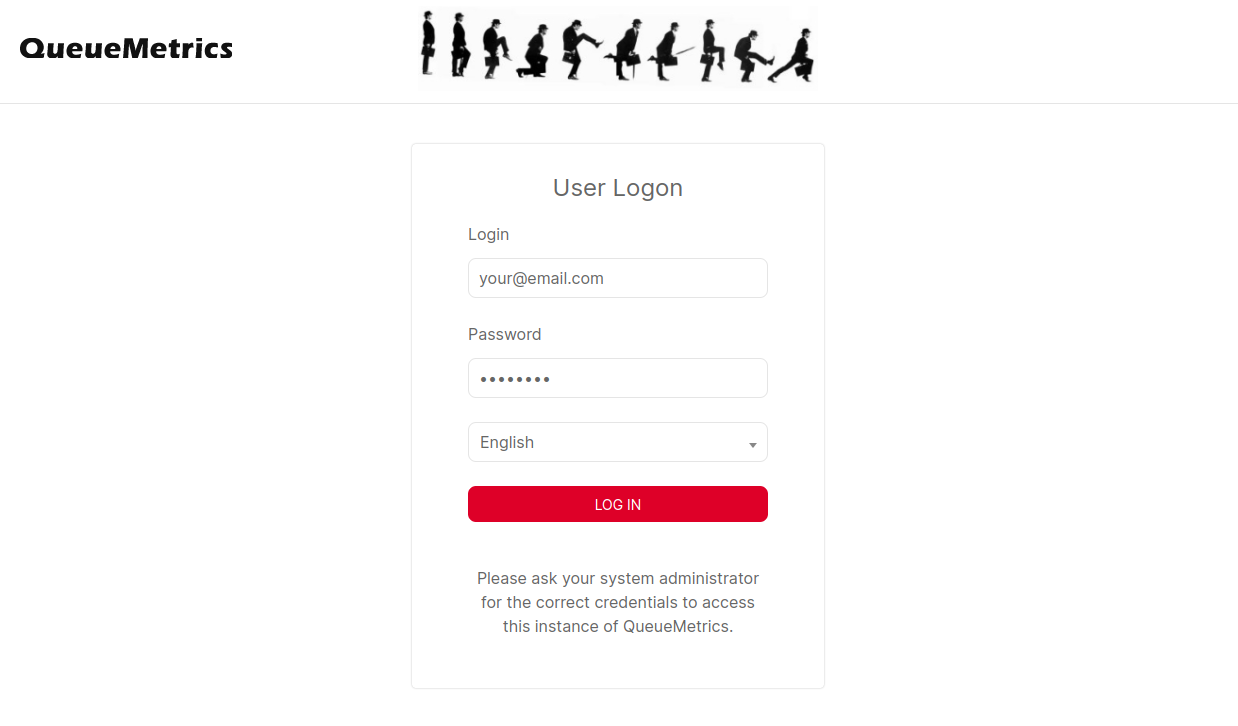
Enter Credentials
Use the Agent Code provided by your administrator (or your e-mail) to log in. If you encounter any issues, ensure that you’re using the correct Agent Code and that the system has been configured correctly.
Once logged in, agents will be presented with the main interface of the QueueMetrics Agent Page, where they can begin their tasks, monitor interactions, and manage client details.
Remember, if you’re ever unsure or encounter issues, reach out to your QueueMetrics administrator for assistance.
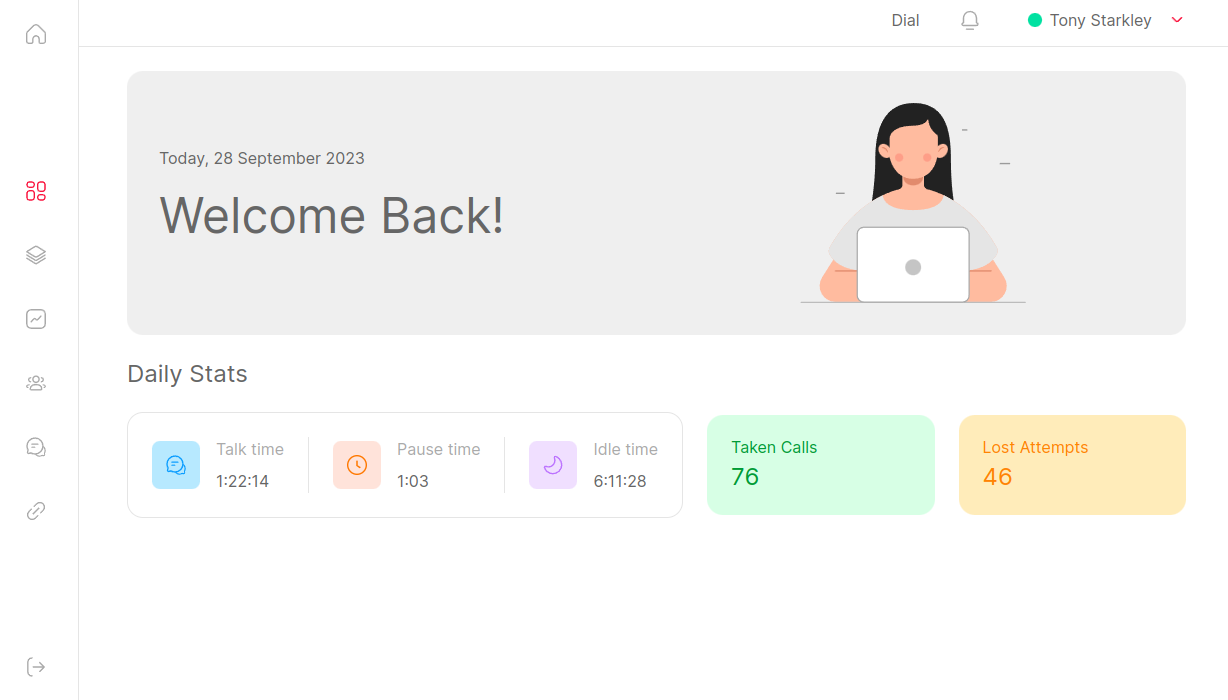
Chapter 2: Overview page
The Overview page of the QueueMetrics Agent Page provides a snapshot of your daily activities and performance. It’s your personal dashboard, giving you insights into your interactions, tasks completed, and areas of improvement.
Accessing the Overview
Navigate to the Overview Section
Once logged in, click on the “Overview” tab from the main interface. This will bring up a summary of your daily statistics and interactions.

Understanding the Data
The Overview page displays various metrics:
- Total Talk time for today
- Total Paused time for today
- Total Idle time for today (not on a call or paused)
- Number of Taken calls for today (inbound and outbound)
- Number of lost Attempts for today (number of times the phone rang, without answering)
Familiarize yourself with these metrics, as they provide valuable feedback on your performance.
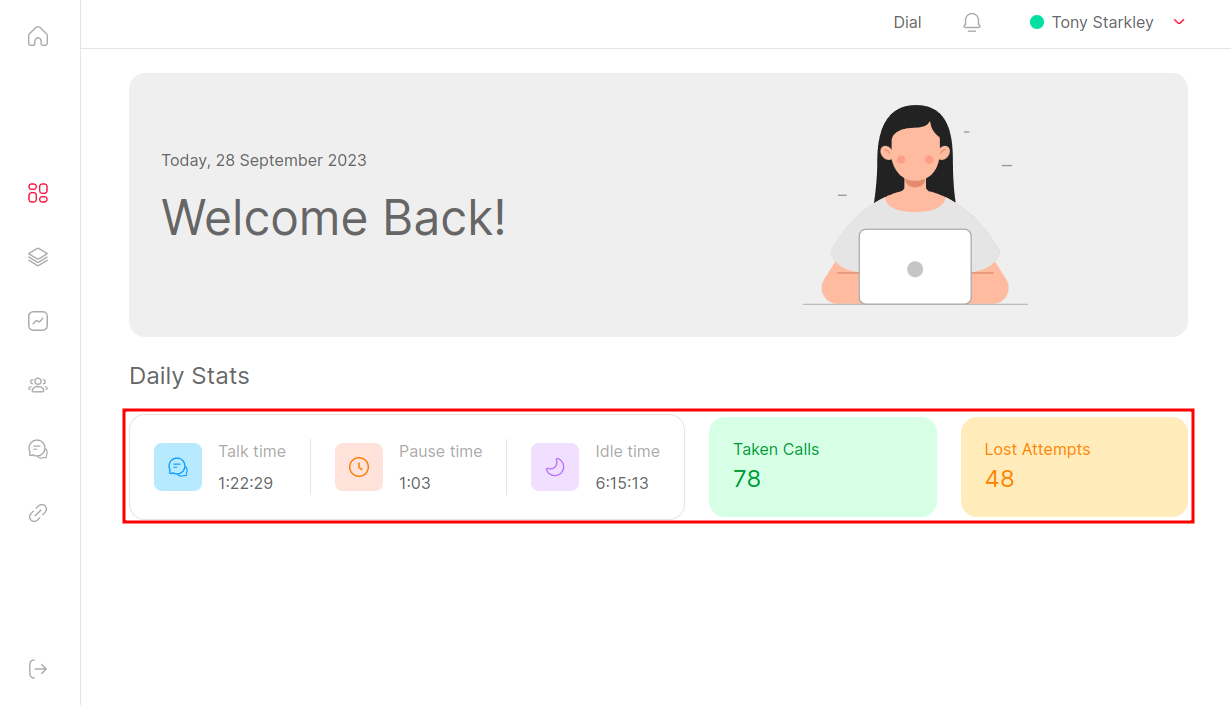
By regularly checking the Overview, you can stay informed about your daily progress and areas where you might need to focus more. It’s a tool designed to help you excel in your role.
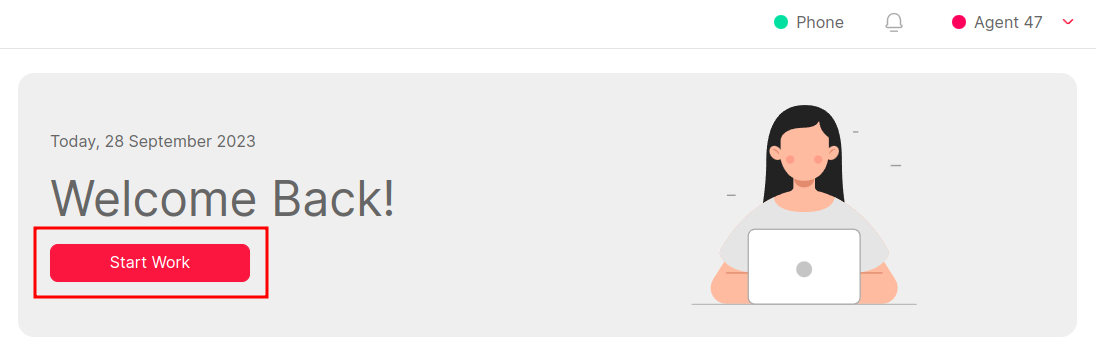
Chapter 3: Start/End Work
Managing the work sessions is crucial to ensure accurate tracking of the agent activities and breaks. The QueueMetrics Agent Page provides tools to help start and end work on the assigned queues seamlessly.
The Start Work button can be used with dynamic agents (agents that log in an out of the queues using QueueMetrics) and when the agents has specific queues assigned to them, by an admin, from the QueueMetrics queue configuration page.
If the agents are statically assigned on the queue from the PBX, or if they do not have queues assigned, the button will not be enabled.
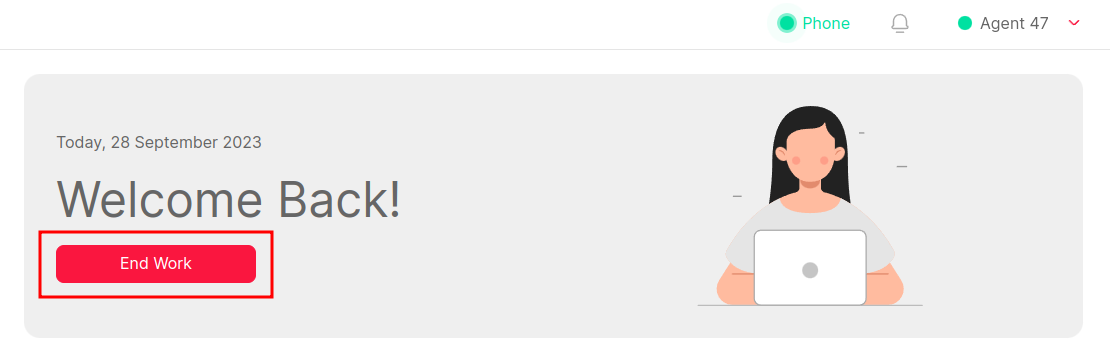
Starting Your Work
Access the Start Work Option
Upon logging in, locate the “Start Work” button from the main interface. Clicking this will indicate that you’ve begun your work session, by automatically logging on the assigned queues.
There is a difference between logging in the QueueMetrics Agent page interface and logging on queues: When you log in the QueueMetrics interface, you will not be available to pick up call automatically. Simply accessing the page will not be enough to start your working day. You will need to log onto one of the queues, in order to start receiving calls.
In case of outbound campaigns, where you are not required to log on a specific queue, make sure to follow the instructions of the supervisor, you might be required to log on a “availability” queue, to track the session and pauses.
Ending Your Work
Access the End Work Option
When you’re ready to conclude your work session, find the “End Work” button. Clicking this ensures that your work session is properly closed, by logging you out from your assigned queues.
It’s essential to accurately start and end your work sessions. This not only helps in tracking your performance but also ensures that you’re credited for the time you’ve worked.
There might be a scenario where clicking the “End Work button” might not be enough to remove yourself from all the queues where you are logged in.
In this case, you might need to manually log out of the queues from the “Queue Control” panel.
More details below.
Chapter 4: Queue Control
The Control section is where agents can actively manage their presence in queues and adjust their status. It’s a vital part of the QueueMetrics Agent Page, ensuring agents have the flexibility to handle their tasks efficiently.
The options available in the Control section may vary based on the permissions and settings configured by the QueueMetrics administrator. It’s essential to be familiar with the functionalities available, to ensure correct tracking of the agent session.
Managing Queues
Access the Queue Control
Upon logging in, navigate to the “Control” section from the main interface. Here, you’ll find options to manage your presence in various queues.

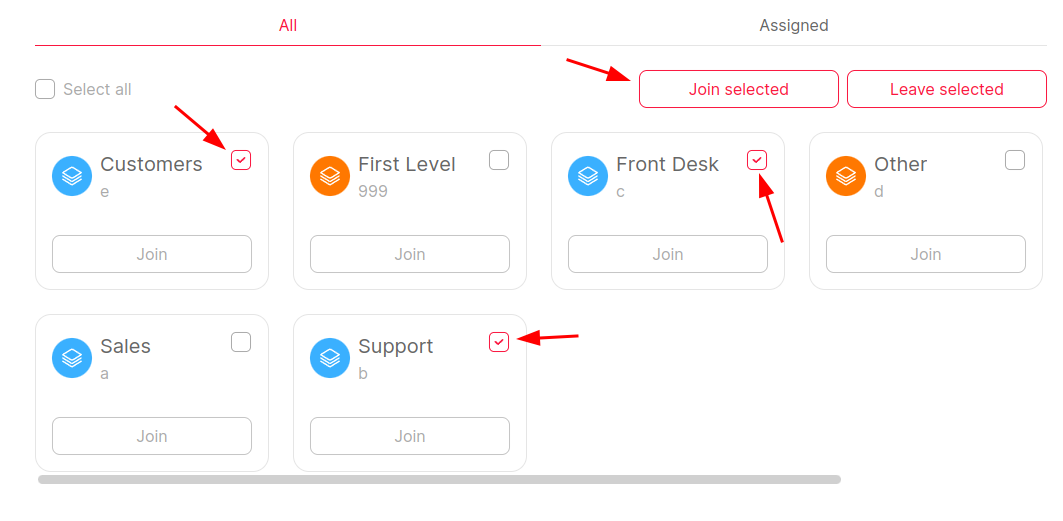
Joining and Leaving Queues
Based on your permissions, you can join or leave specific queues. This ensures you’re available in the right queues at the right times.
For dynamic agents (agents able to log in and out of queues) there will be two options, as far as the extension they are using is concerned:
- Hotdesking → The agent will be able to chose the extension they are going to be using.
- Non hotdesking → The agent can only use the assigned extension.
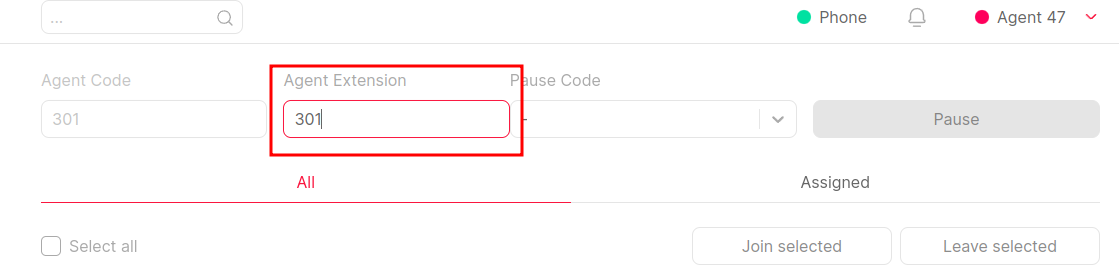
To log on a queue it’s enough to click on the “Join” button. Alternatively, to log on multiple queues, you can click on the checkbox and click the “Join selected” button.
The agent can log on a single, or multiple queues. This behavior can be changed by the administrator from the “Explore system parameters” section of QueueMetrics.
After assigning all the Agent to their queue, the administrator can set the “realtime.dynamicLoginQueues” parameter to “assigned” or “registered”.
- assigned → The login panel shows only the queues assigned to the agent and the agent can login/out on all queues only.
- registered → The login panel shows only the queues assigned to the agent and the agent can login/out on a single queue or on all queues.
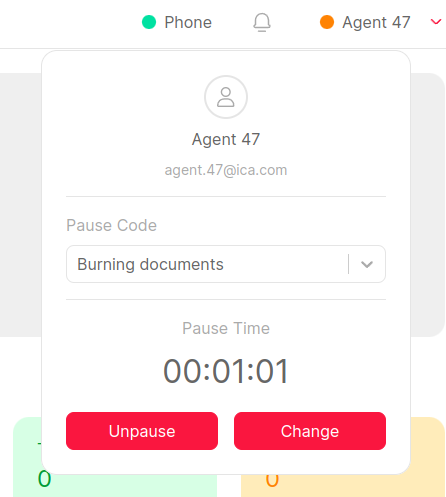
Setting Agent Pause Status
Locate the Status Options
In the Control section, once the agent is logged on queues (or has picked up a call on the static queue), there will be an options to adjust the agent status (pause code).
The pause codes can be customized by the administrator.
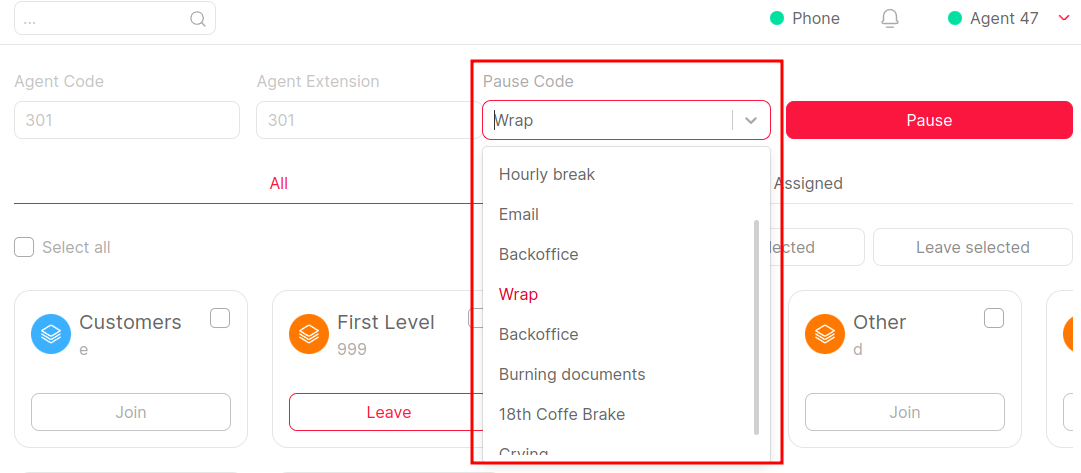
Changing Your Status
Select the desired status, to inform the system and your colleagues about your current availability.
Once you selected a pause code, you can “change”, “amend” or “unpause” the status:
- Change → The default option to change the pause status. It will stop the current pause and start a new pause with the new status.
- Amend → It will consider the entire pause session, as the new amended status. (can be enabled by the administrator)
- Unpause → Conclude the current pause. Making the agent available on the queue again.
Make sure to use the pause codes correctly, since, the status that you chose here, will impact your availability on the queue, and if you receive calls.
The pauses status and agent session will be seen on the QueueMetrics Wallboards and in the Reports.
Chapter 5: Interactions
The Interactions section is the hub where agents can view and manage their daily call interactions. It provides a comprehensive view of all the calls an agent has handled (inbound and outbound), ensuring transparency and clarity in their daily tasks.
The details and options in the Interactions section might differ based on the permissions and configurations set by the QueueMetrics administrator.
Viewing Call Interactions
Access the Interactions Section
After logging in, navigate to the “Interactions” section from the main interface. This area will display a list of all the calls you’ve been involved with during your work session. Inbound and outbound calls will be separated, depending on the queues where the calls were handled.
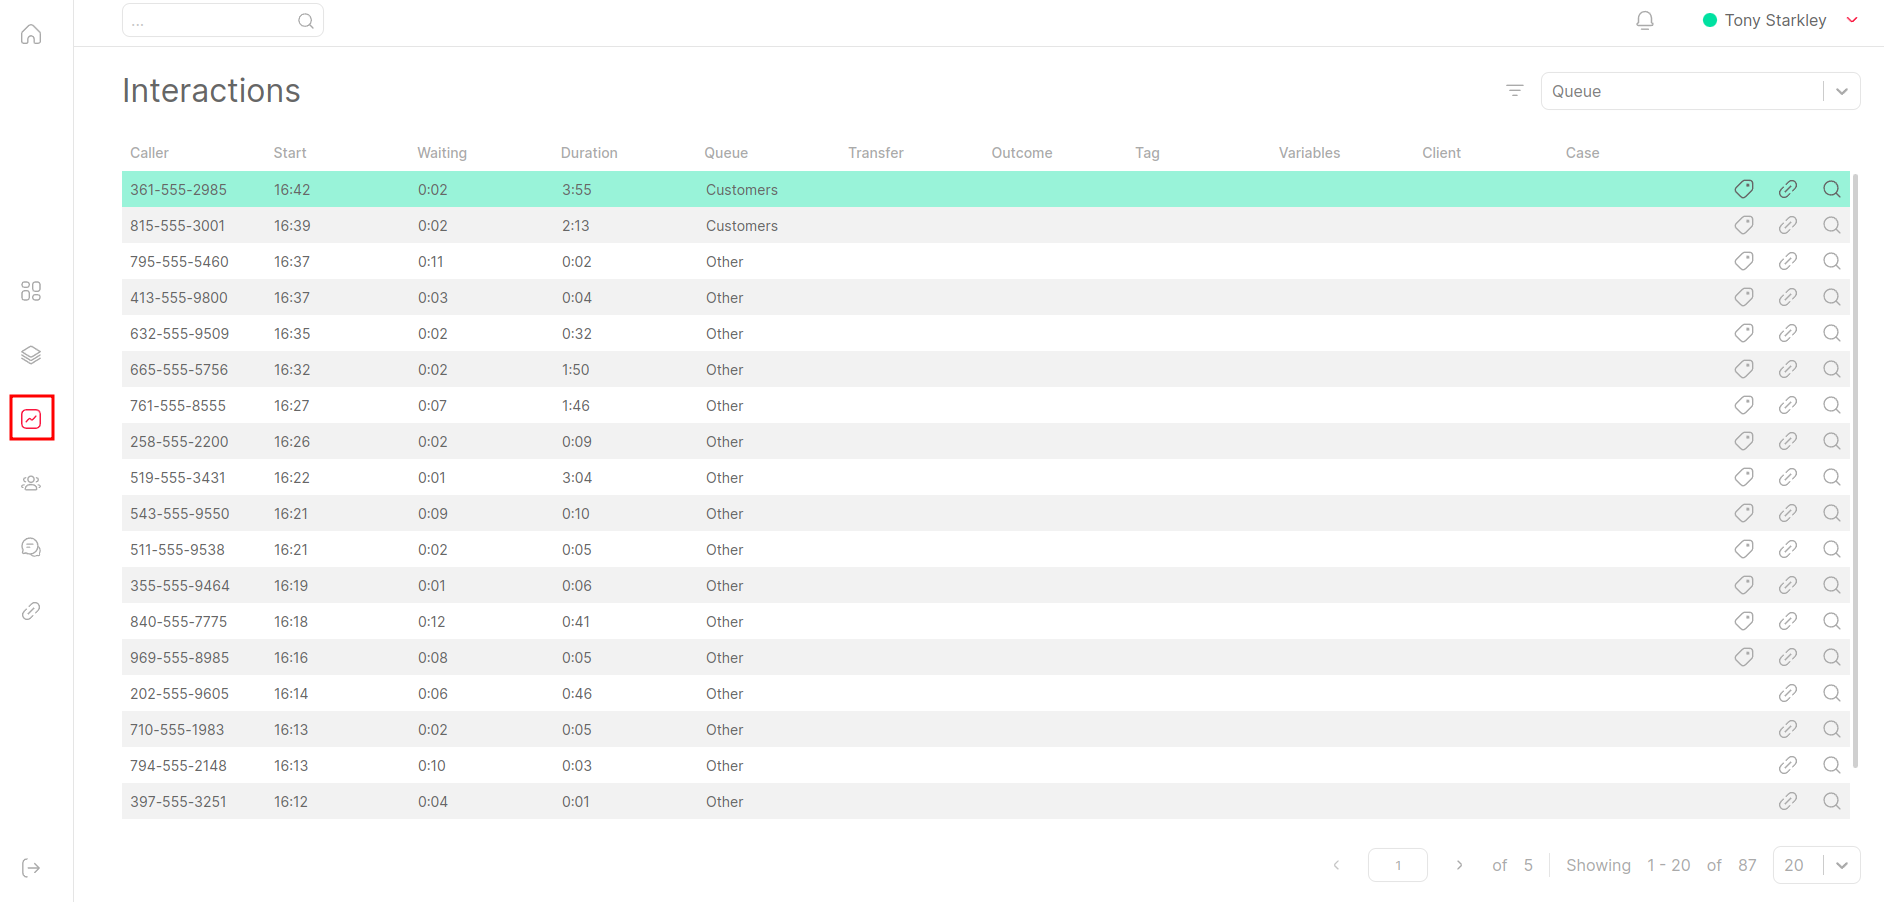
Understanding Call Details
Each call interaction will provide useful details such as:
- Caller number
- Start of the call
- Duration
- Queue where the call was handled
- etc.
By reviewing these details, agents can gain insights into their call patterns, duration, and overall performance.
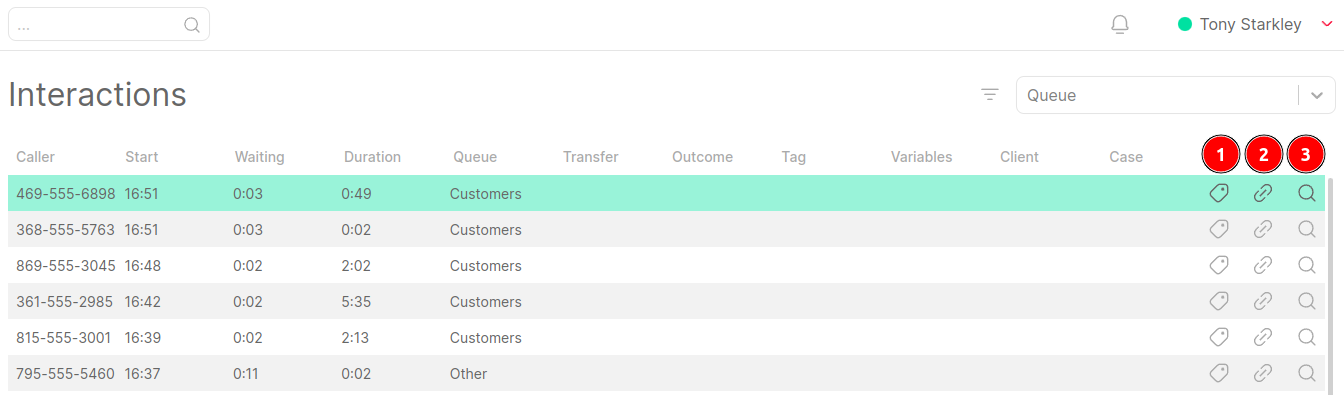
Managing Call Interactions
Locate Interaction Options
Next to each call, there might be options to:
- Label the call (setting a customized Outcome) (1)
- Open call CRM URL (2)
- Display call Details (3)
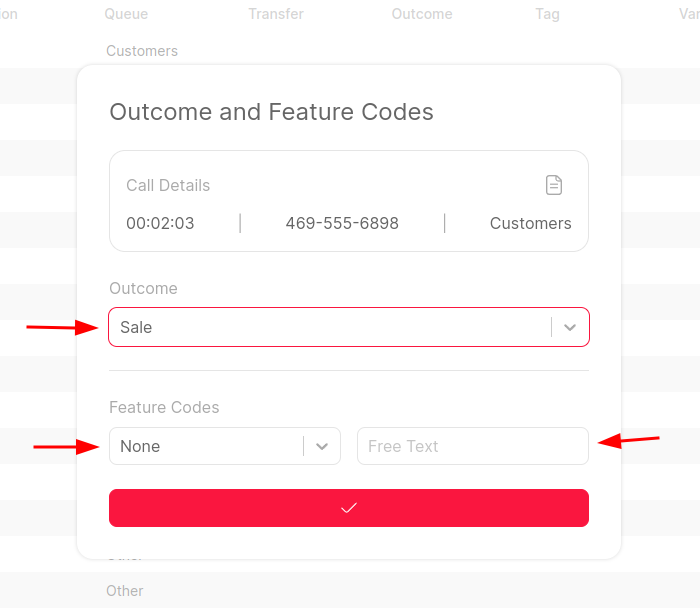
Labeling the Call (Setting a Customized Outcome and Feature codes)
Outcomes are labels that can be assigned to a call, to categorize its result or nature. This helps in tracking the purpose or result of each interaction. For example, you might label a call as “Successful Sale,” “Technical Support,” or “Follow-up Needed”.
The agent will have a predefined list of outcomes available, that can be customized by the administrator. By default an Outcome can be set within 30 minutes, after the call ended.
The tagged calls can be later filtered in the QueueMetrics reports.
You can set one Outcome and multiple Feature codes, depending on the needs.
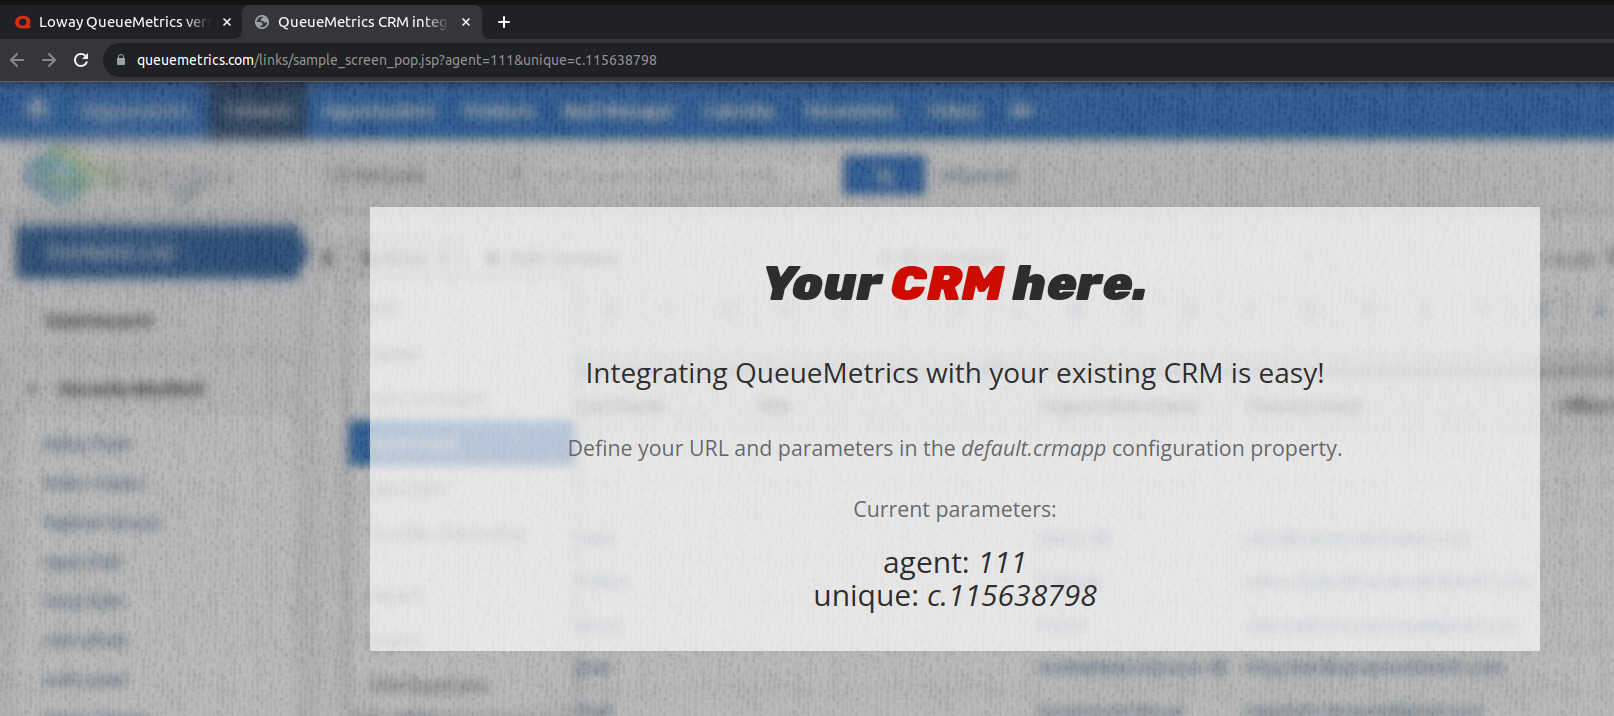
Opening Call CRM URL
If your QueueMetrics system is integrated with a CRM, you can directly access the CRM’s information related to a specific call. This feature provides a seamless transition between the call interaction and the CRM’s data.
To access the CRM, there are two options:
- Manual → By clicking on the CRM link from the “Call Details”. (more details below)
- Automatic → From the “Interactions” section of the Agent Page, the CRM will be opened in a new browser tab, every time a call is answered (or made, in case of an Outbound call). The agent page will automatically send to the CRM specific variables, that the administrator has configured. (like: caller ID, agent code, call time…)
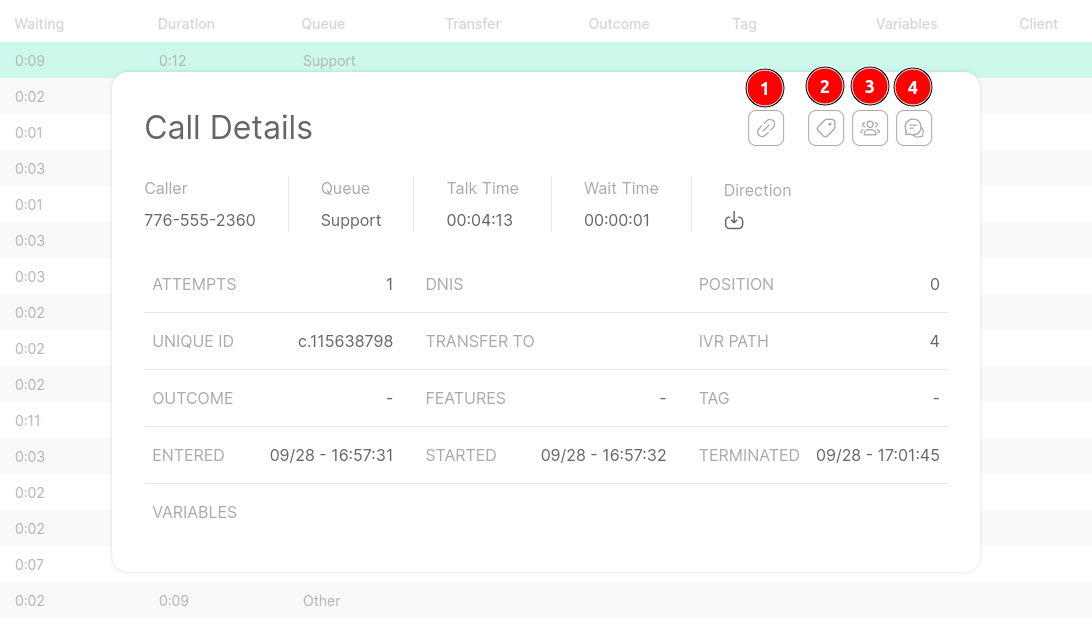
Displaying Call Details
The Call Details panel provides an in-depth look into the specifics of a call as well as interaction options.
Here, you can find most details related to a call, that can be useful to you. As well as allowing to assign a specific call to a case, or a client.
In the call details you might find (depending on your configuration):
- CRM link (1)
- Call tagging (Outcome and Feature code) (2)
- Assign call to a Client (3)
- Assign call to a Case (4)
Chapter 6: Notifications
Staying updated with essential information is crucial. The Notifications section ensures that you’re always in the loop with real-time updates, announcements, or any other pertinent details.
The content and frequency of these notifications are determined by the QueueMetrics administrator or other relevant personnel. (like supervisors or managers)
Accessing Notifications
Locate the Notifications Icon
Upon logging in, you’ll spot a “Bell” icon in the top bar on the right-hand side. This is your Notifications panel.
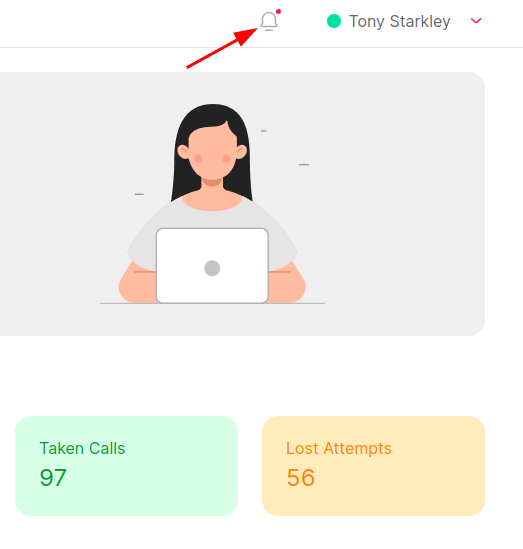
Understanding Notifications
A red dot on the “Bell” icon indicates new unread messages. Clicking on the icon will expand the Notifications panel, revealing the content of the messages.
Each notification comes with a timestamp, so you know exactly when the information was relayed.
Key Features
- Red Dot Indicator → A visual cue signaling new messages.
- Message Content → Directly view the content of received messages within the panel.
- Time → Provides context on when each message was sent.
The messages you will receive will be tasks from the supervisor or messages sent using the “Broadcast” feature.
You will not be able to reply to the messages from this interface.
Regularly checking the Notifications panel ensures you’re always updated with the latest announcements or crucial information.
Chapter 7: Clients and Cases
The “Clients and Cases” sections are designed to help manage and view details related to specific clients and the cases associated with them.
This feature allows you to assign calls to Clients and Cases, as well as notes. This can be a powerful tool to keep track of important information.
The availability and depth of information in the “Clients and Cases” section can vary based on the permissions and configurations set by the QueueMetrics administrator.
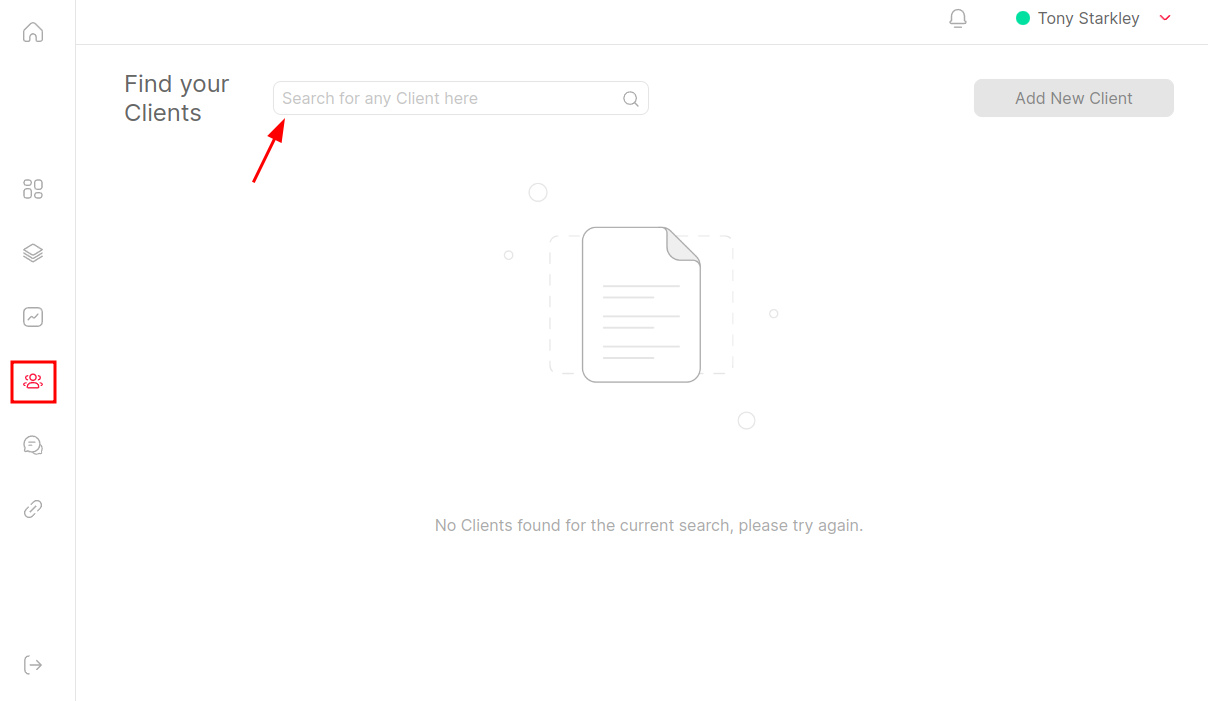
Accessing Client Details
Navigate to the Clients Section
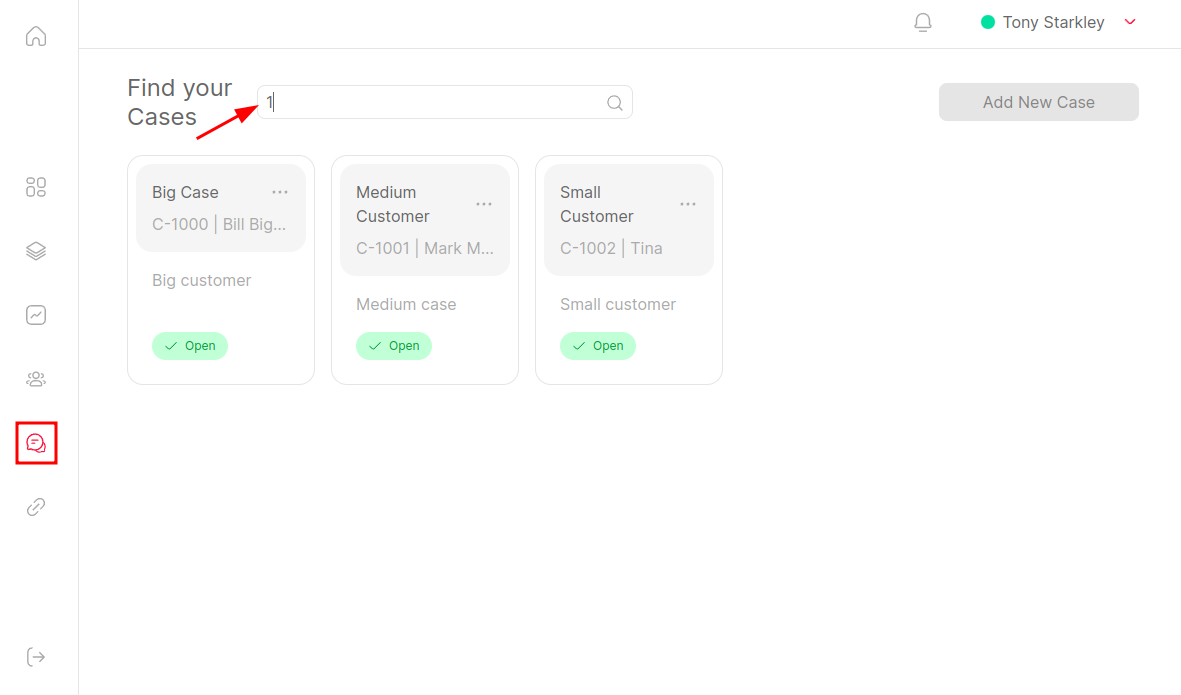
The “Clients and Cases” sections can be found below the Interactions section, on the main interface. Here, you’ll find a search option to access individual client profiles and cases. Both feature work very similarly.
Once you open the interface, you will find an empty page. You will need to search for a specific client (or case) name, or code.
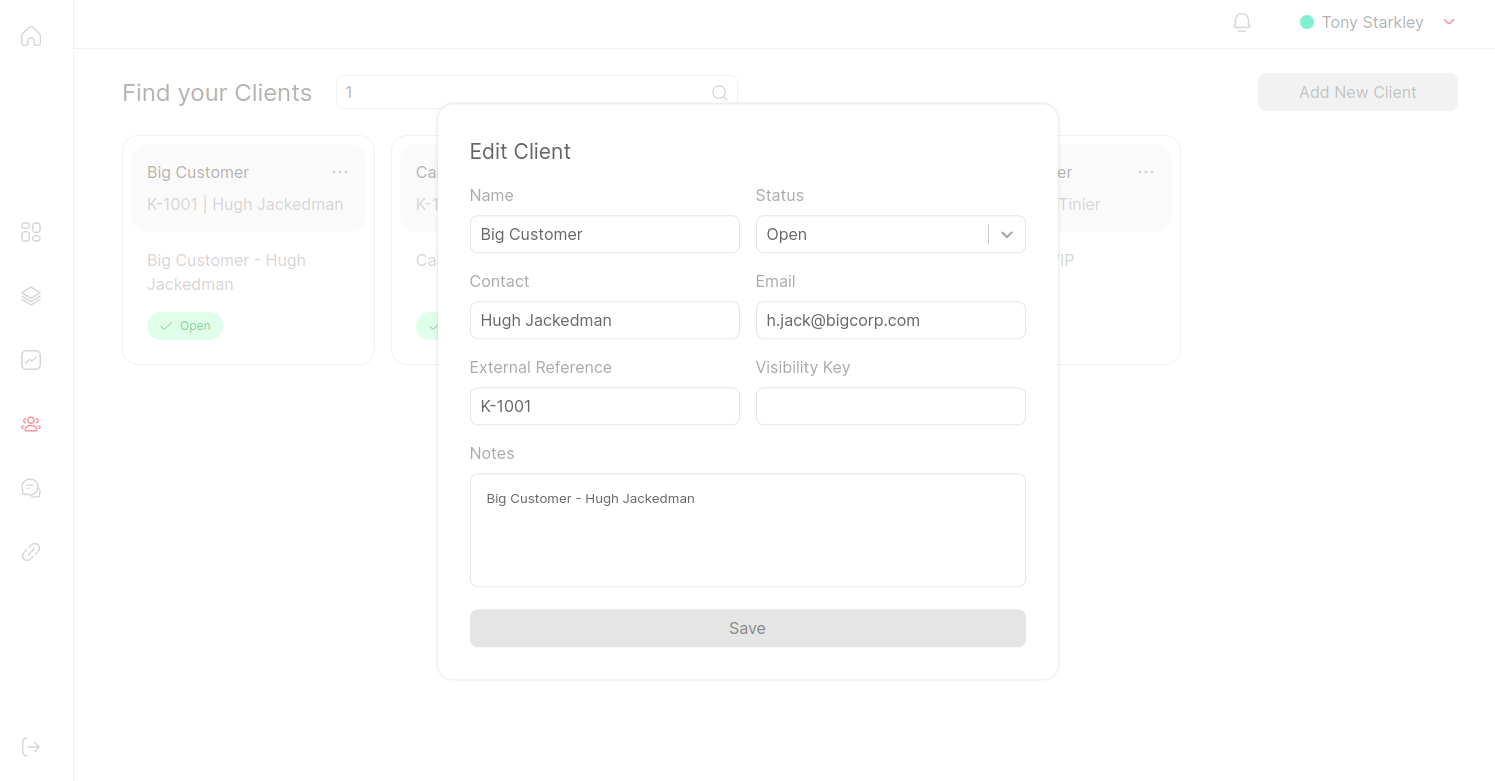
Understanding Client Profiles
Each client profile may contain:
- Personal details like name, contact number, and email.
- Client status.
- Interaction history, showing past calls and outcomes.
- Notes or tags added by agents or the system.
- Associated cases or tickets.
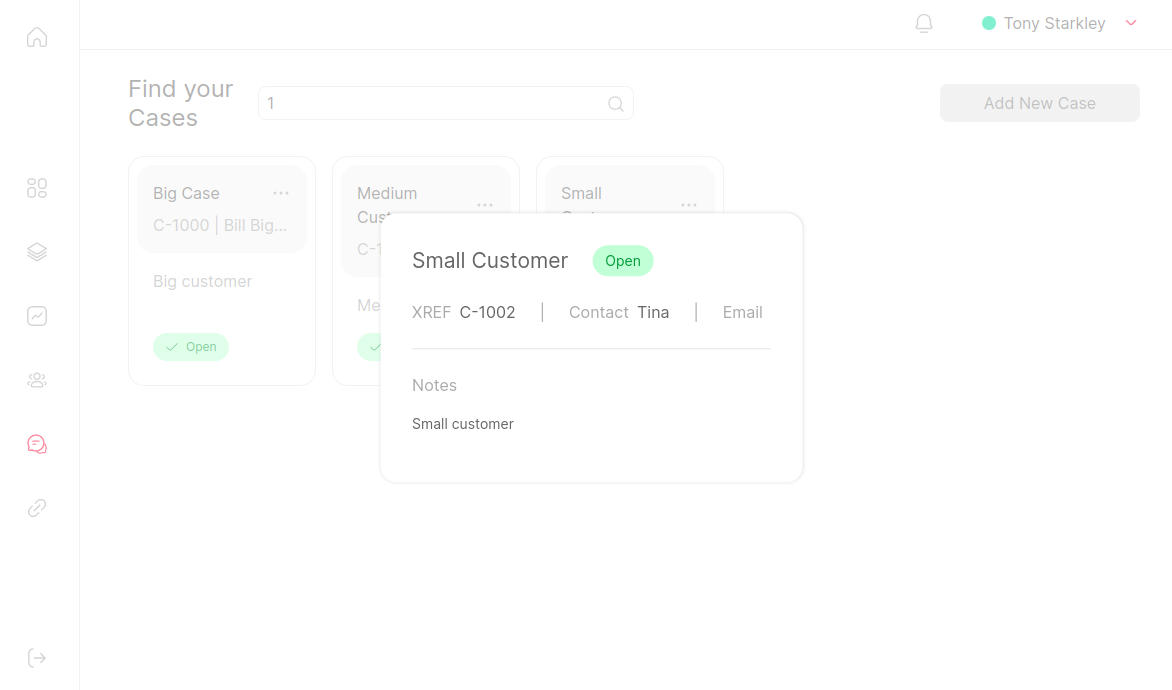
Managing Cases
Accessing Cases
Within a client’s profile, there might be a section dedicated to cases or tickets associated with that client. This can include support tickets, sales inquiries, or any other type of case your organization manages.
Understanding and Updating Cases
Each case will have:
- A unique identifier or case number.
- Status (opened/closed).
- Details or description of the case.
- Any associated interactions or call logs.
Agents can update case details, add notes, or change the status based on the interaction with the client and the progress of the case.
The “Clients” and “Cases” sections can be powerful tools that aid agents in providing customer service by offering a detailed view of each client’s history and needs.
Chapter 8: Custom Links
QueueMetrics offers the capability to integrate with external Customer Relationship Management (CRM) systems, or any other application that can be interacted with using custom URLs.
The integration ensures that agents have a seamless experience, with all client-related information centralized in one place, enhancing the efficiency and effectiveness of interactions.
The specifics of the integration, including which systems are supported and how data is synchronized, are determined by the QueueMetrics administrator.
Accessing the custom links
Navigate to the custom URL Section
On the main interface, there might be a dedicated tab for the custom CRM links, depending on the integration.
Accessing this will provide you with a direct link to the external application. (it can be a CRM or any other application that allows the integration)

Accessing custom links
Agents can search for specific, custom links in this section. This ensures that agents have all the information they need at their fingertips during interactions.
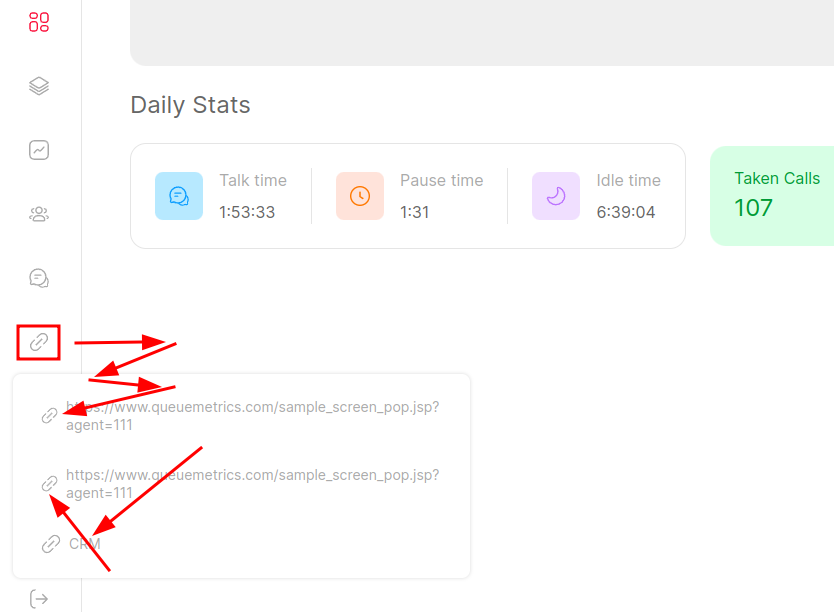
The custom URL integration is a powerful feature that bridges the gap between QueueMetrics and external systems and CRMs.
Chapter 9: WebRTC SoftPhone
The SoftPhone feature in QueueMetrics is a built-in tool that allows agents to make and receive calls directly from the agent page. This integration streamlines the call handling process, ensuring agents can efficiently manage their interactions.
The availability and functionality of the SoftPhone feature can vary based on the configurations set by the QueueMetrics administrator and the underlying telephony system. QueueMetrics simply connects to an existing WebRTC connection, using the provided credentials.
Accessing the SoftPhone
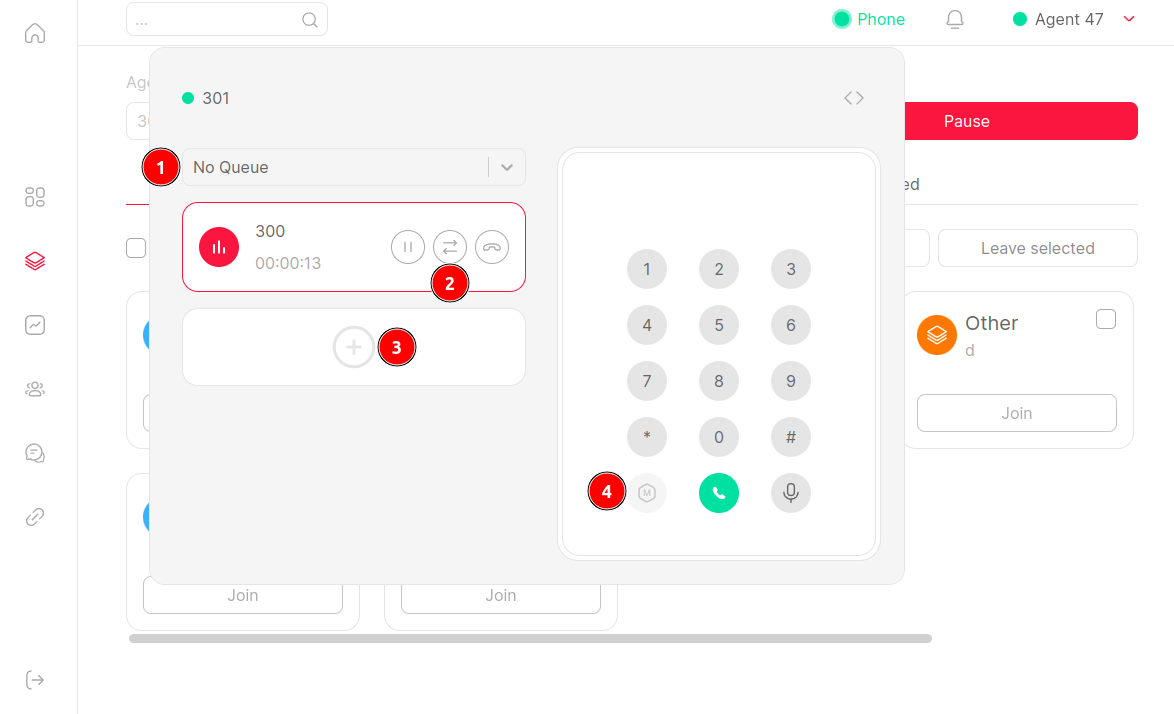
Locate the SoftPhone Interface
Upon logging into QueueMetrics, you’ll find the Softphone interface in the upper right corner of the main agent page. This interface provides all the essential controls for managing calls.

Making and Receiving Calls
Initiating a Call
To make an outbound call, simply enter the desired phone number or extension into the Softphone dial pad and press the call button.
Or, by clicking on a caller number, from the “Interactions” section, automatically pasting the number in the phone dial, ready to be dialed.
Receiving a Call
When an inbound call arrives, the Softphone will notify you, and you can answer the call directly from the interface.
The softphone can be closed by clicking outside the phone interface, and opened back again by clicking the “Phone” button.
If a call is ongoing in the background, the “Phone” button will pulsate green, notifying you that the a call is still in progress.
Key SoftPhone Features
- Outbound dialing → Allows agents to manually dial numbers. (1)
- Call controls → Essential controls like answer, hang up, hold, and transfer. (2)
- Multi-session dialing → Make multiple calls in parallel (conference mode not available). (3)
- Auto-answer → The ability for an admin to enable the auto-answer feature. (4)
Chapter 10: Agent Status Panel
The Agent Status Panel in QueueMetrics provides a real-time snapshot of an agent’s current status, be it available, on a call, or on a break. This feature ensures that both agents and supervisors have a clear understanding of the agent’s availability and activity at any given moment.
The information displayed in the Agent Status Panel is determined by the agent’s interactions with the system and the configurations set by the QueueMetrics administrator.
Accessing the Agent Status Panel
Locate the Status Panel Interface
After logging into QueueMetrics, the Agent Status Panel can be found in the upper right corner of the main agent page. It provides immediate insights into the agent’s current status.
Understanding the Status Indicators
Available Status
When an agent is ready to take calls and is not on any break, the status will show as “Available” (green dot). This indicates to the system and supervisors that the agent can handle incoming calls.
Pause Statuses
Agents can set various pause statuses (customizable by the administrator), such as “Lunch Break” or “Meeting”. These statuses inform the system and supervisors that the agent is temporarily unavailable to handle calls.
Key Features of the Agent Status Panel
- Ease of use → The panel is available on all sections of the agent page.
- Real-time updates → The panel updates in real-time, reflecting the agent’s queue status (does not display the “device” status).
- Quick status change → Agents can quickly change their status directly from the panel, ensuring accurate tracking.
Chapter 11: Keyboard Shortcuts
For agents who prioritize swift navigation and efficient task management, QueueMetrics offers a comprehensive range of keyboard shortcuts.
These shortcuts are designed to expedite common tasks, providing a more streamlined user experience.
The QueueMetrics Agent page supports full keyboard navigation, utilizing the tab and arrow keys.
Common Keyboard Shortcuts
Navigation Shortcuts
- ctrl + alt + o → Navigates to the Overview page.
- ctrl + alt + i → Navigates to the Interactions page.
- ctrl + alt + c → Navigates to the Control page.
- ctrl + alt + t → Navigates to the Clients page.
Topbar Shortcuts
- ctrl + alt + p → Toggles the Softphone panel.
- ctrl + alt + n → Toggles the Notifications panel.
- ctrl + alt + a → Toggles the Agent Status panel.
Control Shortcuts
- ctrl + alt + w → Toggles the Start/End work button on the Overview page.
- ctrl + alt + b → Controls the Pause/Unpause function on the Control page.
- ctrl + alt + m → Controls the Change/Amend pause function on the Control page.
- ctrl + alt + j → Joins the selected queues on the Control page.
- ctrl + alt + u → Leaves the selected queues on the Control page.
Softphone Keyboard Shortcuts
- Enter (while typing in the input box): Dial a number.
- Ctrl + e → Hang up the current call.
- Ctrl + + → Add a new session.
- Ctrl + a → Answer an incoming call.
- Ctrl + b → Access the Transfer panel.
Mastering these keyboard shortcuts can greatly enhance your experience with QueueMetrics, making daily tasks more seamless and efficient.
Conclusion
Thank you for taking the time to explore this comprehensive guide to the QueueMetrics agent page. From the basics of logging on queues to the intricacies of CRM integration and efficient navigation using keyboard shortcuts.
QueueMetrics is designed with adaptability and user-friendliness in mind. As you continue to use the system, remember that this guide is here to assist you. Whether you’re an agent aiming to streamline your daily tasks or an administrator looking to optimize the platform for your team, the insights provided here are crafted to enhance your experience and ensure you extract the maximum value from the software.
Should you have any questions, feedback, or require further assistance, please don’t hesitate to reach out to our support team. We’re here to help!
QueueMetrics References
QueueMetrics software is available on premise or as a cloud hosted service for FreePBX, Yeastar S PBX, Grandstream, Issabel, FusionPBX and many other Asterisk and Freeswitch distros.
For more technical information please refer to the User Manual.
Visit www.queuemetrics.com for a free 15 days full-featured trial.
keyboard_arrow_left Back